Showing posts with label Christmas Classics. Show all posts

Saturday, January 20, 2024

CHOCOLATE PEANUT BUTTER MARSHMALLOW SQUARES (aka CONFETTI SQUARES)

 CHOCOLATE PEANUT BUTTER MARSHMALLOW aka CONFETTI SQUARES

True confessions: I didn't take a photo of just my chocolate/marshmallow/peanut butter squares (aka "confetti") so I am sharing a photo of our Christmas Cookie "Tree" display. Lots of goodies on there - some recipes I have previously shared, some yet to come. But anyway, this is our variety, and if you look carefully, on the bottom part of the cookie stand, you can see (left to right), cherry coconut slice, spritz cookies and yes, lurking to the right my ultimate favorite, chocolate confetti. So easy, so much fun to make a SO delicious!

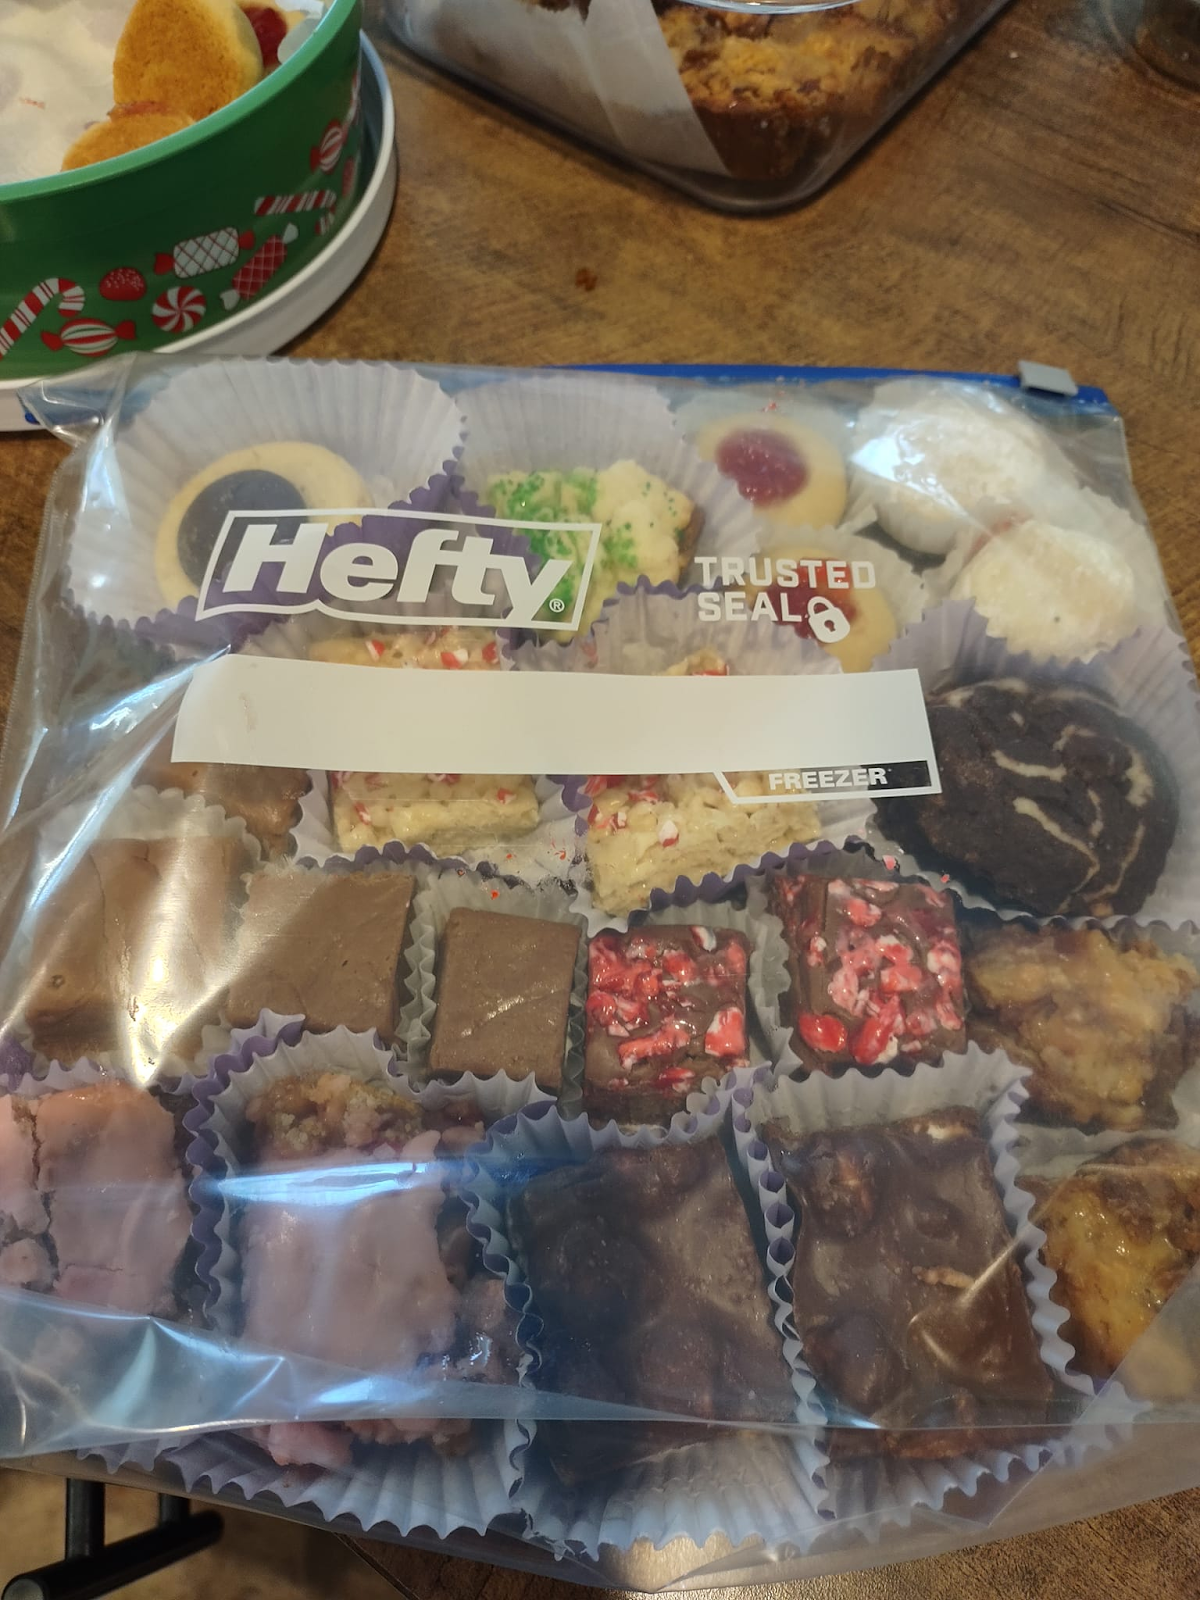

I decided to get smart and make stacking the dang thing a bit easier, so I packaged the variety of baking, tucked into cupcake liners, into freezer bags for easier filling. We do love our cookies! The Chocolate Marshmallow Squares have a prominent place on the bottom right of the bag since I like big chunks of this square - ok I admit it, it is an addiction! But the packed bag is so pretty that I had to share it, too. Just think, all the years I have done Christmas baking and have never thought of this little time and space-saver! Whoah!


So, what is the difference between "Chocolate Confetti" and Chocolate Peanut Butter Square? In my opinion, "Confetti" uses colored mini marshmallows while my square uses white marshmallows. Traditionally, Confetti uses milk chocolate chips while my square - this year - was a mix of half dark and half milk chocolate, which made all the difference. Whichever you prefer, all I know is that I have trouble stopping at one piece, hence only having 2 on the tray at once! Oh, and I prefer making it in a foil pan lined with foil so it's easier to remove and cut without issue. Just a little hint there. This year, I also added about half a cup of marshmallows to the pot while the mixture was still quite warm, so they added a bit of gooeyness, a chewier texture that we liked.


INGREDIENTS:

  • 1/4 c unsalted butter
  • 1/2 c cup creamy peanut butter
  • 3/4 c semi-sweet chocolate chips
  • 3/4 c dark chocolate chips (or use all milk or semi-sweet if you prefer)
  • 5 c white mini marshmallows (rainbow marshmallows for Confetti slice)
DIRECTIONS:
  1. Line an 8x8 or 9x9 foil pan (or baking pan) with aluminum foil. 
  2. In a medium saucepan, over low heat, combine butter, peanut butter and chocolate chips. Melt, stirring until smooth and completely combined.
  3. Remove from heat and stir in 1/c marshmallows - just for the square, not the Confetti.
  4. Let cool slightly and then mix in the remainder of the marshmallows.
  5. Spread in prepared pan and let set at room temperature. 
Note: The slice can be frozen at this point, but I find it much more attractive if sliced into squares with a sharp knife when set, then stored in the freezer in a freezer bag (as pictured above). Don't forget to save a few slices for the baker and a helper to sample! SOMEONE has to taste-test the goods!


Spritz Cookies (Cookie Press)

                                                          SPRITZ COOKIES


This cookie is one of my hubby's favorites, and since he could actually enjoy them this year, I made them as a special treat. I have always found them extremely fussy and guess what? I discovered that the difference is in the dough! Sheesh! Who would have guessed it! So here is a great "found" recipe with perhaps a tweak or two to make them even better.

Note: The recipe makes a LOT of dough - it pretty much filled the bowl of my stand mixer (my new toy). So, you can either go on "Cookie Palooza" and git going, using different sprinkles, cherries, tiny gumdrops or chocolate chips and so on for the center. The main thing is not to fret! Even if the cookies aren't perfect, they are the closest I have found to what I would deem a very light shortbread (my favorite) and a good, solid spritz dough. Enjoy, and if you prefer, you can freeze some of the dough for up to 3 months, wrapped in plastic wrap and place in a zipped plastic bag. The entire batch will take at least 3 cookie sheets, depending upon how large you "spritz your cookies." I do love my vintage cookie maker!


PUTTING ON THE SPRITZ


Ingredients:

  • 1 c unsalted butter, softened to room temperature
  • 3/4 c granulated sugar
  • 1 large egg, room temperature
  • 1 tsp pure vanilla extra (I used this for the first time and it makes a difference)
  • 1 tsp almond extract (we don't care for almonds, so I doubled the vanilla)
  • 1/2 to 1 tsp cinnamon
  • 2 1/3 c all-purpose flour, spooned and leveled
  • 1/2 tsp salt
The fun stuff: gel food coloring, sprinkles, chocolate chips, melted chocolates, halved maraschino cherries, etc. Let your imagination fly! If you want to use gel food coloring you only need a bit to color cookies before baking, since you want to keep them pastel. 

Instructions:
  1. Preheat oven to 350 degrees (177 C)
  2. Line 2 or 3 large baking sheets with silicone baking mats or use nonstick bakeware with no liner. (HINT: I have discovered that pressed cookies do not adhere to parchment paper BUT you can use aluminum foil with the dull side up as long as you watch that the bottoms don't brown too much. Do not use nonstick foil! This may mean slightly reducing baking time. If you can chill the prepared baking sheets, that works even better.)
  3. Making the dough: In the large bowl that comes with your stand mixer (or your own bowl using a handheld mixer) fitted with a paddle attachment, beat the butter and granulated sugar together on MEDIUM-HIGH for approximately 2 minutes. Add the egg, vanilla and almond extract (if desired). Beat on HIGH for about 1 minute. Scrape sides and the bowl bottom, beating again for an additional minute to combine. On LOW, beat in flour, cinnamon and salt. Turn to HIGH and beat until completely combined. It will start forming a ball. You can add gel food coloring at this point if you like.
  4. Pressing the dough: Fit the cookie press with your first decorative plate. It's fun to use variety, especially if you have children helping you. Hold the cookie press perpendicular to your pan (one edge touching and the press at an angle to help the dough stick), press out the cookies approximately 2 inches apart. Don't make too huge or press too hard or they may become distorted and won't be as pretty. If using sprinkles, brush the formed cookies lightly with water to help them stick before sprinkling and placing in the oven. If you find the dough is getting too soft, simply refrigerate between pressing, while the first cookie sheet is in the oven. 
  5. Baking: Bake for approximately 7-9 minutes. You want the bottoms just golden, not dark. Using foil as a liner on pans may take just 5 minutes per pan, depending upon your oven. I have a gas range that runs hotter, so I have to be really careful. Allow about 5 minutes before removing from pans to cool completely. I just put them on my counter on a clean tea towel, but some prefer using a rack. This is the time to drizzle on melted chocolate if you like.
Hints: 
  • Dough may be made beforehand and chilled in the fridge until you are ready to make your cookies. If you freeze the dough, take it out and let it thaw to room temperature before using the press. 
  • If you don't have a cookie press, you can use a pastry bag with a star tip or other decorative cookie tip.  But since my vintage press is my choice, it comes out every Christmas. We found it years ago at the thrift store.


Thursday, January 3, 2013

Cheese Ball with Attitude

There is nothing "cheesy" about this non-traditional version of the traditional appetizer or snack except the abundance of cheese and other goodness inside. Serve with crackers of your choice (preferably those which are a bit more sturdy). Great with a glass of vino, a stein of brew or your favorite beverage. Simply delicious.
                                                             
Cheese Ball

Totally tasty yummy deliciousness

Ingredients:
Cheese Ball
  • 1 pkg of Neufchatel cheese
  • 3/4 pkg shredded medium or sharp cheddar cheese (about 1 1/2 c or so)
  • 1/4 diced medium sweet onion (approx. 1/4 c)
  • 1/4 c grated Parmesan or Parmesan/Romano cheese
  • 1 tsp red pepper flakes or a dash of Tabasco Sauce (if desired)
  • 1 tsp Worcestershire Sauce (if desired)
Topping
  • 1/2 small single serving pkg of cheddar cheese Sunchips, crushed
  • 1/4 c dried parsley flakes
  • 1/2 c finely chopped pecans

I prefer Neufchatel to Cream Cheese because of the lower calorie count and the fact that it's softer and easier to work with, requiring no softening.
  1. Mix all cheeses and onion (and pepper flakes and Worcestershire sauce, if desired), first with a wooden spoon to smush it together and then with your hands (yes, it will be messy). 
  2. Quickly shape into 2 smooth round balls of roughly the same size. Let sit while preparing the topping.
  3. In a pie plate (or dish with sides), mix topping ingredients together. 
  4. Roll the cheese balls in the topping to cover completely. 
  5. Wrap in cling wrap or place in a Ziploc bag and store in the fridge until serving time. If possible, let flavors blend by not serving for at least 4 hours or overnight. Keeps well for up to a week, if refrigerated in Ziploc bag.
SO much tastier than the supermarket variety, and just think -  you made it all by yourself!

Saturday, December 22, 2012

Zwieback (double buns)

These little buns have been a tradition in my family for several generations. It just wouldn't be Christmas without them. I remember my mom, all hot and bothered, fussing with these and making Schoenekuchen (nice cookies - a very soft cut-out sugar type cookie) as they rose. Mine are never as pretty and even as hers were - she is a perfectionist - but they still bring up those Christmas memories!

Zwieback
Zwieback
Beware: these make a lot of buns, so be prepared to use a large cookie sheet and small 24-cup muffin tin like I did, with enough left over for the next recipe - apple buns or a fruit square (platz).

The farm method:
  • Prepare 1 pkg fast-rising yeast or 1 tbsp dry yeast as directed on package.
  • Stir risen yeast and pour into a large bowl. Add 3 c warm water and enough flour for a sponge (puffy soft starter dough) - about 3-4 c flour for this amount of liquid - and beat well. Let stand, covered in warm spot.
  • Place in medium saucepan: 2 c warm milk, 3 sticks (1 1/2c) butter or margarine (or half and half shortening and butter), 1/2 c white sugar, 1/4 c salt. Warm on medium heat just until the margarine starts to melt and the sugar is dissolved. Let cool slightly.
  • Stir together in bowl containing the 'sponge,' mixing well and adding 4-6 more cups of flour to make a medium-soft smooth elastic dough. Knead flour in on floured surface once you can no longer mix it in with a wooden spoon.
  • Grease the bowl and top of dough and let rise til doubled, about 2 hours or so, covered with a tea towel.
  • When dough is ready, turn out on to floured surface and let rest, covered with a tea towel for about 10 minutes. Then pinch off (or cut with serrated knife) pieces of dough that you can roll into balls which are about the size of a small egg (equal to the size of 2 walnuts). Use a cupped hand to roll the dough against the palm of your other hand or a floured surface to make smooth balls. When you make enough base pieces, make balls about half that size for the top buns. Press gently together (don't worry if they fall to the side when rising - mine always do).
You can  use a greased cookie sheet:
Little buns - not perfect but sweet all the same
Or greased miniature muffin tins (or both):
A bevy of finished zwieback baked in mini muffin tins

  • Let rise for approximately an hour and bake in 350-375 degree oven for 20-30 minutes, until a light golden brown.
  • Cool on a covered surface (I usually reuse the tea towels) and then pull apart the top from the bottom and enjoy with a bit of butter and/or jam.

Next recipe: apple buns.

Sunday, November 18, 2012

Apple Cinnamon Bread and Rolls

Aren't recipes that do double duty fun? This one makes a perfect (huge) loaf of apple cinnamon bread AND 9 humongous or 12 big apple cinnamon rolls, just by doubling the recipe. Easy to do, and the result is very impressive! I prefer real eggs to substitutes when making bread, so that's what I used.

Apple Cinnamon Bread
Huge and delicious Apple Cinnamon Bread

Ingredients (may be doubled to make bread AND rolls)
  • 2 1/2 - 3 c all-purpose flour
  • 1 pkg active dry yeast
  • 2/3 c fat-free milk
  • 2 tbsp granulated sugar
  • 1 tbsp cooking oil (I used 2 tbsp margarine)
  • 1/8 tsp salt
  • 1 large egg
  • Nonstick cooking spray
  • 1-2 tsp packed golden brown sugar (or more)
  • 1-2 tsp ground cinnamon
  • 2 tbsp melted margarine
  • 1 medium cooking apple (I used Granny Smith)
  • 1/3 c powdered sugar (optional)
  • 1- 1 1/2 tsp apple juice or fat-free milk (optional)

Talk about a huge loaf of bread! 
Directions
  1. Place 1/2 c warm water and 1 tsp sugar in a glass measuring cup or bowl. Sprinkle on 1 pkg yeast and let sit to rise for 10 minutes. Place 1 c of flour in a large mixing bowl. 
  2. In saucepan, heat and stir milk, granulated sugar, oil (margarine) and salt JUST until warm. Add to flour mixture along with the yeast and egg. Beat with an electric mixer on low or medium speed for 30 seconds to blend. Increase mixer speed to medium or high and mix and scrape the sides of the bowl for an additional 3 minutes. This gives you the desirable air bubbles to help the dough rise. Using a wooden spoon, stir in as much of the remaining flour as you can. 
  3. On a lightly floured surface, knead in enough of the remaining flour to make a moderately stiff dough that's smooth and elastic. This takes 5 to 10 minutes. You may need to sprinkle on a bit of extra flour as you work the dough to keep it from being sticky. Shape into a ball. Place in a lightly greased bowl, turning once to grease surface. 
  4. Cover and let rise in a warm place until double (about one hour). I turned my oven to 150 degrees, let it preheat and turned it off. A couple of minutes later, it proved to be a perfect rising spot for my dough. I wrapped dough and bowl in a clean tea towel to keep it warm.
  5. Punch dough down. Turn onto a lightly floured surface. Cover to rest for 10 minutes. Spray an 8x4x2 inch loaf pan WELL with nonstick cooking spray. Set aside. In a small mixing bowl, stir together brown sugar and cinnamon. Set aside. Peel and chop apple into small pieces and sprinkle with lemon juice. 
  6. Roll dough into a 12x8 rectangle. Spread with approximately 2 tbsp of melted margarine. Sprinkle with brown sugar and cinnamon mixture and then sprinkle apple chunks evenly on top.
  7. Starting from the short side, roll carefully like a jelly roll. Seal the edges and ends, placing bread seam-side down in a prepared (cooking spray coated) pan. Cover and let rise until double in side (about 30 to 45 minutes). 
  8. Bake in 375 degree F oven for 25 to 30 minutes, until the bread sounds hollow when tapped. Mine took the full 30 minutes. You may cover bread with foil during the last 10-15 minutes of baking to prevent over-browning. 
  9. Remove from pan and cool on wire rack or clean tea towel. 
  10. If desired, stir together powdered sugar and enough apple juice or milk to drizzle over the top of the loaf. This makes one loaf of bread.
TO MAKE ROLLS:
My kitchen never smelled better!

**DOUBLE THE RECIPE.** 
  1. Make bread as directed, using half the dough and reserving the remaining half of the dough to make the rolls. I simply chopped up 3 medium apples and a little extra cinnamon and brown sugar to make sure we would have enough to give it that delicious flavor. 
  2. Use the other half of the dough to make another roll-up, as you would for the bread. Using a serrated knife, dental floss or thread, cut the roll into 9 to 12 equal sized pieces to form rolls. Instead of placing in a loaf pan, spray a 9x9 or 9x13 baking pan WELL with cooking spray. 
  3. Spread bottom of pan with approximately 2 tbsp melted butter or margarine and sprinkle with brown or golden brown sugar. Place rolls in prepared pan, either 3 across and 4 down for smaller rolls (in 9x13 pan) or 3 across and 3 down in 9x13 pan for huge rolls. Place tiny pieces of butter or margarine between rolls to give you a bit of a glazed/sticky bun effect once baked. Your choice.
 
4. Let rise for half an hour, as with the bread and then bake with the bread to give you twice the deliciousness. It should take approximate 20-25 minutes, depending upon the size of the rolls.
5. Once done, remove from oven and let sit for 10 minutes before inverting onto a wire rack or clean tea towel. You may spread with frosting (as above) if desired. This recipe makes wonderful cinnamon apple rolls.

Note: it's better not to frost bread or buns before freezing. If you wish, you may save half to eat now and freeze the rest in Ziploc bags or freezer containers. Thaw and frost before serving. I froze the loaf and kept the cinnamon rolls to eat now :P

Monday, February 20, 2012

Rum Cake

This recipe is deliciously decadent. I happen to really like rum, so this was the perfect recipe for my collection. Give it a try and see what you think?

Rum Cake


Ingredients

  • 1 box yellow cake mix
  • 4 eggs 
  • 1/2 c oil
  • 1/2 c water
  • 1/2 c finely chopped walnuts or pecans
Mix together all ingredients. Spray a Bundt pan with cooking spray, then sprinkle chopped nuts over the bottom. Pour in cake batter and bake for 325 degrees for 40-50 minutes (check with knife at minimum time).

Rum Glaze
  • 1 stick margarine
  • 1 c sugar
  • 1/4 c water
Combine ingredients in a sauce pan and bring to boil. When it begins to boil, remove from heat and add 1/8 c rum. Pour glaze over the cake.

Monday, December 12, 2011

Blini: Russian Festival Pancakes or Crepes


This is a traditional holiday dish for Russian families and those of Russian heritage. It is not unlike a crepe, and any number of fillings can be used. As they say, it's all in the wrist action when you pour these into the pan and tilt and rotate to get them even in consistency. You get better with practice, believe me!

Blini
Ingredients
·          4 1/4 cups milk
·          5 eggs
·          1/3 teaspoon salt
·          2 tablespoons white sugar
·          1/2 teaspoon baking soda
·          1/8 teaspoon citric acid powder(or the juice of a lemon or half an orange)
·          4 cups all-purpose flour
·          3 tablespoons vegetable oil
·          1 cup boiling water
·          2/3 cup butter, divided

Directions

1.                       Beat together the milk and the eggs. Stir in the salt and the sugar and mix well. Add the baking soda and citric acid.
2.                       Blend in the flour. Add the vegetable oil and pour in the boiling water, stirring constantly. The batter should be very thin, almost watery. Set the bowl aside and let it rest for 20 minutes.
3.                       Melt a tablespoon of butter in a small frying pan over medium-high heat. Pick the pan up off the heat. Pour in a ladleful of batter while you rotate your wrist, tilting the pan so the batter makes a circle and coats the bottom. The blini should be very thin.
4.                       Return the pan to the heat. Cook the blini for 90 seconds. Carefully lift up an edge of the blini to see if it's fully cooked: the edges will be golden and it should have brown spots on the surface. Flip the blini over and cook the other side for 1 minute.
5.                       Transfer the blini to a plate lined with a clean kitchen towel. Continue cooking the blini, adding an additional tablespoon of butter to the pan after each 4 blini. Stack them on top of each other and cover with the kitchen towel to keep warm.
6.                       Spread your favorite filling in the center of the blini, and fold three times to make a triangle shape. You can also fold up all 4 sides, like a small burrito.
 Cook's Note
Rub the pan with butter or lard after frying every 4 blini. Don't worry if the first few don't turn out right; you'll get the hang of it. The thinner the blini, the more attractive.
- Suggested fillings: cooked ground meat, mashed potatoes with onion, berries & sour cream or powdered sugar, or chocolate sauce to dip in or drizzled over the top. Good with cottage cheese and sour cream, too!

Monday, December 5, 2011

Peach Kuchen

Here's another Winnipeg favorite, although I never have figured out why it's called "kuchen" (cookies) and not a torte! This is a traditional German and Mennonite dish usually made from fresh peaches, although you may use canned in a pinch. I have made it using any variety of fruit from apples to peaches to red plums or pears. All are delicious and all make everyday summer desserts or treats for the holiday season. Good with heavy cream, whipping cream or vanilla ice cream.

Peach Kuchen (a variation of Apfel or Apple Kuchen)
Photo from tasteofhome.com
Ingredients

  • 1/2 cup margarine
  • 1/4 cup white sugar
  • 1 teaspoon vanilla extract
  • 1 cup all-purpose flour
  • 1/2 teaspoon baking powder
  • 1/4 teaspoon salt
  •  1 (29 ounce) can sliced peaches, drained or (preferably) fresh peaches
  • 3 tablespoons white sugar
  • 1 teaspoon ground cinnamon


Directions

1.      Preheat oven to 350 degrees F (175 degrees C). Grease and flour a 9 inch springform pan. Sift together the flour, baking powder and salt. Set aside.
2.      In a large bowl, cream together the butter and sugar until light and fluffy. Beat in the egg, then stir in the vanilla. Beat in the flour mixture. 
3.  Spread dough with hands over the bottom and 1 inch up the sides of prepared springform pan. Arrange peach slices in a spoke pattern over the dough. Sprinkle with sugar and cinnamon.


Bake in the preheated oven for 35 to 40 minutes, or until golden brown.

Wednesday, November 30, 2011

Classic Pinwheel Cookies - Raspberry or Chocolate

Pinwheel cookies have always been one of my favorite Christmas Cookies. They are attractive, colorful and I love the flavor. I recently found a recipe in one of my old cookbooks that is the best I have found, and branched out into making raspberry pinwheels for the first time! I may never go back to just chocolate again, although I will always make those, too. The chocolate one is much easier than the recipe I used to use, where you placed chocolate dough on top of a portion of plain dough to roll together to make the pinwheel design.

With this recipe, after you divide the dough into 4 parts, you use 2 portions to make the raspberry and 2 portions for the chocolate. A bit of variety and color on your cookie plate or for your bake exchange or sale. Plus you have the advantage of the refrigerated dough, where you can make them, chill them, and bake them when you have the time.

Pinwheel Cookies
Raspberry Pinwheel Cookies

INGREDIENTS:
COOKIE DOUGH
  • 1 c butter or margarine, softened
  • 1 c brown sugar (packed)
  • 1 c granulated sugar
  • 2 eggs
  • 2 tbsp vanilla
  • 3 ½ c all-purpose flour
  • 1 tsp baking soda
  • ½ tsp salt
 Directions
  1.  Cream butter with the 2 sugars in a mixing bowl. Beat in eggs, one at a time. Add vanilla.
  2. Stir in flour, baking soda and salt. Divide dough into 4 parts. Roll each part ¼ inch thick into a  rectangular shape
  3. Spread with your choice of fillings, roll up (like a jellyroll) and chill overnight, wrapped in waxed paper or cling wrap.
  4. When ready, unwrap and slice ¼ inch thick and placed on greased cookie sheets.
  5. Bake at 375 degrees for about 8-10 minutes, until the bottoms are slightly golden and the cookies are “set.” Makes about 8 dozen.

FILLINGS

For Chocolate: (a nut-free recipe)

Spread ½ of the dough with 1 c MELTED semi-sweet or dark (I used dark) chocolate chips. Roll, wrap and chill. Let warm at room temperature slightly before slicing or chocolate may be too hard. Bake as directed.

For Raspberry: (has nuts in it)

Spread 1/2 of the dough with a mixture of 1 c raspberry jam, 1 c shredded coconut and ½ c finely chopped nuts. I used chopped hazelnuts but walnuts or pecans would be delicious, too. If you find the mixture too thick to spread, add a little additional jam until you can easily spread it on the dough.Roll, wrap and chill. Cut and bake as directed in recipe. 

Chocolate Pinwheel Cookies

Spritz Christmas Cookies


We have an ancient copper and metal cookie press that was made back in the '60s. We actually found it at a thrift store and got really excited. Mike remembered Spritz cookies from when he was young, and I had never used a press before. Because of it's age, the cookie press does take some effort, but the end result, the choice of disks and the pure enjoyment in using it, makes these cookies a Christmas tradition in our home

SPRITZ CHRISTMAS COOKIES - nut-free recipe

Ingredients
  •  1 ½ c butter, softened (I used butter-flavored Crisco and got better than normal results)
  • 1 c packed golden brown sugar
  • 1 tsp baking powder
  • 1 egg
  • 1 tsp vanilla
  • ½ tsp run extract (you can also use almond or any other flavor)
  • 3 ½ c all-purpose flour
  • 2 tbsp (approx) milk or until the dough holds together when worked with your hands. If you don’t add the milk it may be too thick for the cookie press.
  • 1 recipe Powdered Sugar Glaze (below)
  • Coarse sugar; silver dragees; non-pareils (sprinkles) – if desired. You may wish to use food coloring, a drop at a time, to color a portion of the icing (green for the Christmas trees, pink for the blossoms, etc.)
 Directions

  1. Preheat oven to 375 degrees F.  In large mixing bowl, beat butter <Crisco> with an electric mixer on med to high speed for 30 seconds (or by hand like I did). Add brown sugar and baking powder. Beat until combined, scraping bowl occasionally. Beat in the egg, vanilla, milk (as needed) and extract until combined. Stir in any remaining flour. I added a few tbsp of milk to make the dough easier to work with. You want a firm (not sticky) dough - one that will go through the discs more easily. It will be thick, like a shortbread dough, so I didn’t bother with the mixer at all, just used “elbow grease.
  2. Force unchilled dough through a cookie press fitted with your favorite Christmas shape, directly onto the ungreased cookie sheet. I preferred the Christmas tree, poinsettia, blossom and pinwheel shapes. Bake in the preheated oven for 7 to 9 minutes, or until edges are a very light golden color. Transfer to a wire rack or towel and let cool.
  3. Brush tops with the Powdered Sugar glaze and, while still well, decorate as desired. Place a silver dragee, cinnamon candy or whatever else you like in the center if you are making a blossom cookie. The glaze remains almost transparent, which gives a glazed effect. Arrange on waxed paper or on a tea towel and let stand until dry. This makes about 80 cookies.
Powdered Sugar Glaze
Mix 2c of Icing Sugar with a tsp of vanilla extract and a few tbsp of milk. Make the icing thin enough to be runny, about the consistency of heavy cream.

The cookies may be frozen in an airtight container, but will keep for several days at room temperature. Using Crisco gives them a lighter texture and color, and  I prefer it to using butter or (especially) margarine.

Sunday, November 27, 2011

Chocolate, Hazelnut & Caramel Thumbprint Cookies

This is a beautiful little cookie. The recipe is "said" to make 35 cookies. I made them a bit bigger and ended up with approximately 20. I just added an additional 5 minutes to the recommended baking time. A real holiday treat, originally found at the BHG website and adapted to fit my baking needs. Please note: I did not top mine with a whole hazelnut - they were far too expensive! But I did manage to find finely chopped hazelnuts at our local grocery store.


Chocolate Caramel & Hazelnut Thumbprint Cookies
<From the BHG website>
Ingredients

  • 1
    cup all-purpose flour
  • 1/3
    cup cocoa powder
  • 1/2
    cup butter or margarine, softened
  • 2/3
    cup sugar
  • 1/4
    teaspoon salt
  • 1
    egg yolk
  • 2
    tablespoons milk
  • 1
    teaspoon vanilla
  • 1
    cup finely chopped hazelnuts (filberts)
  • 1
    egg white, lightly beaten
  • 1/2 c
    thick caramel ice cream topping
  • 1/2
    cup semisweet chocolate pieces
    teaspoon shortening

In a small bowl combine flour and cocoa powder; set aside. In a medium bowl beat butter with an electric mixer on medium to high speed for 30 seconds. Add sugar and salt; beat until combined, scraping side of bowl occasionally. Beat in egg yolk, milk, and vanilla until combined. Beat in as much of the flour mixture as you can with the mixer. Using a wooden spoon, stir in any remaining flour mixture. NOTE: I used a wooden spoon for the entire procedure since I don't have a mixer. Cover; chill for at least 1 hour
Preheat oven to 350 degrees F. Grease two cookie sheets; set aside. Shape dough into 1-inch balls. Place the 1 cup hazelnuts on a sheet of waxed paper. Dip balls in egg white and roll in hazelnuts. Place 1 inch apart on prepared cookie sheets. Using your thumb, make an indentation in the center of each cookie. Bake for 10 to 12 minutes or until edges are firm NOTE: If your cookies are larger, bake an additional 5 minutes.
Immediately after removing cookies from the oven, use the rounded side of a 1-teaspoon measuring spoon to press down the center of each cookie. Transfer to wire racks; cool. Spoon about 1 teaspoon of caramel topping into the center of each cookie.
In a small microwave-safe bowl combine chocolate pieces and shortening. Microwave on 100 percent power (high) for 30 to 45 seconds or until softened; stir until smooth. Place a small mound of chocolate on top of each cookie. Top with a whole hazelnut (if desired). Let stand until chocolate is set.