Showing posts with label Chocolate Decadence. Show all posts

Saturday, January 20, 2024

CHOCOLATE PEANUT BUTTER MARSHMALLOW SQUARES (aka CONFETTI SQUARES)

 CHOCOLATE PEANUT BUTTER MARSHMALLOW aka CONFETTI SQUARES

True confessions: I didn't take a photo of just my chocolate/marshmallow/peanut butter squares (aka "confetti") so I am sharing a photo of our Christmas Cookie "Tree" display. Lots of goodies on there - some recipes I have previously shared, some yet to come. But anyway, this is our variety, and if you look carefully, on the bottom part of the cookie stand, you can see (left to right), cherry coconut slice, spritz cookies and yes, lurking to the right my ultimate favorite, chocolate confetti. So easy, so much fun to make a SO delicious!

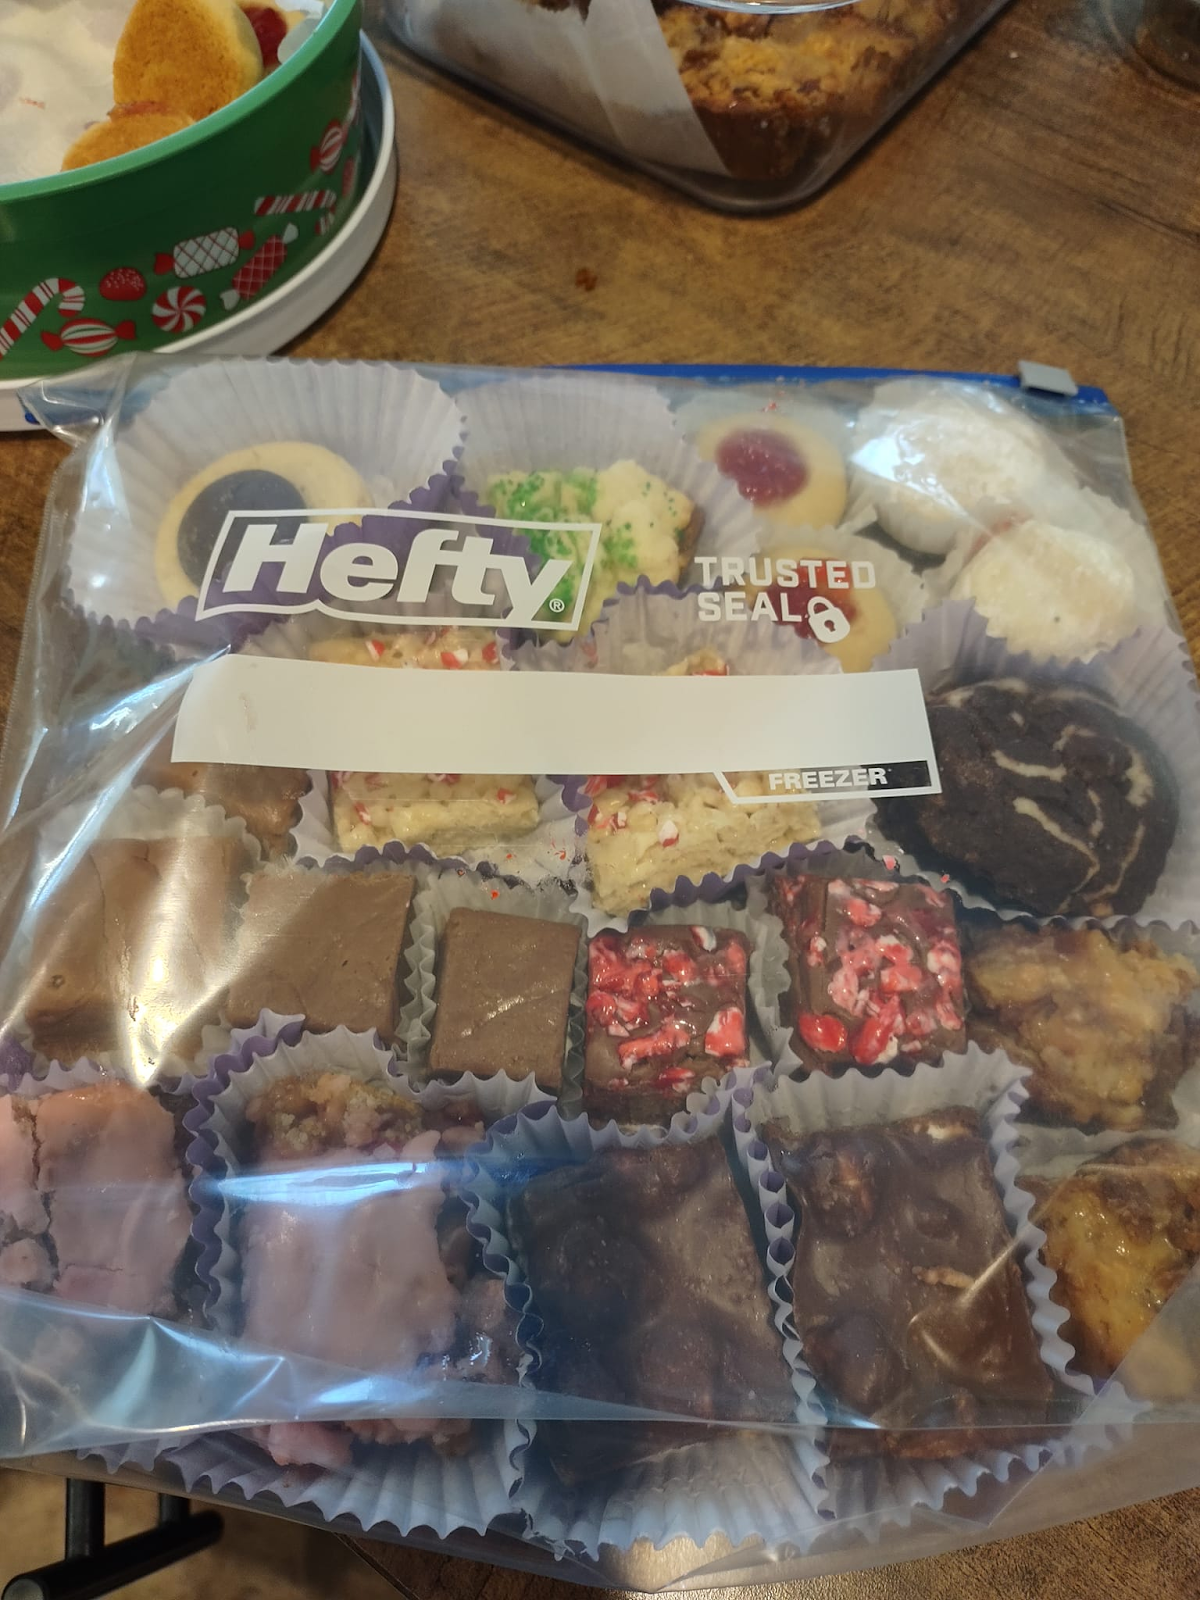

I decided to get smart and make stacking the dang thing a bit easier, so I packaged the variety of baking, tucked into cupcake liners, into freezer bags for easier filling. We do love our cookies! The Chocolate Marshmallow Squares have a prominent place on the bottom right of the bag since I like big chunks of this square - ok I admit it, it is an addiction! But the packed bag is so pretty that I had to share it, too. Just think, all the years I have done Christmas baking and have never thought of this little time and space-saver! Whoah!


So, what is the difference between "Chocolate Confetti" and Chocolate Peanut Butter Square? In my opinion, "Confetti" uses colored mini marshmallows while my square uses white marshmallows. Traditionally, Confetti uses milk chocolate chips while my square - this year - was a mix of half dark and half milk chocolate, which made all the difference. Whichever you prefer, all I know is that I have trouble stopping at one piece, hence only having 2 on the tray at once! Oh, and I prefer making it in a foil pan lined with foil so it's easier to remove and cut without issue. Just a little hint there. This year, I also added about half a cup of marshmallows to the pot while the mixture was still quite warm, so they added a bit of gooeyness, a chewier texture that we liked.


INGREDIENTS:

  • 1/4 c unsalted butter
  • 1/2 c cup creamy peanut butter
  • 3/4 c semi-sweet chocolate chips
  • 3/4 c dark chocolate chips (or use all milk or semi-sweet if you prefer)
  • 5 c white mini marshmallows (rainbow marshmallows for Confetti slice)
DIRECTIONS:
  1. Line an 8x8 or 9x9 foil pan (or baking pan) with aluminum foil. 
  2. In a medium saucepan, over low heat, combine butter, peanut butter and chocolate chips. Melt, stirring until smooth and completely combined.
  3. Remove from heat and stir in 1/c marshmallows - just for the square, not the Confetti.
  4. Let cool slightly and then mix in the remainder of the marshmallows.
  5. Spread in prepared pan and let set at room temperature. 
Note: The slice can be frozen at this point, but I find it much more attractive if sliced into squares with a sharp knife when set, then stored in the freezer in a freezer bag (as pictured above). Don't forget to save a few slices for the baker and a helper to sample! SOMEONE has to taste-test the goods!


Monday, July 15, 2013

Double Chocolate S'mores Brownies

Double Chocolate S'mores Brownies


These delicious brownies were created using ideas from several different recipes. When I accidentally used sweetened condensed instead of evaporated milk, I  had to made some adaptations to make the recipe 'work.' Hey, it happens to the best of us! :) The result was ooey gooey, caramel-y brownie perfection. Kept at room temperature, they will last for 4 to 5 days in a cool place. I like to store mine in a covered plastic ice cream pail with waxed paper between the layers. Why the "S'mores" name? Because of the combination of graham wafers, chocolate and mini marshmallows, of course!

Ingredients

Brownies
  • 1 box of Betty Crocker Super Moist Chocolate Cake Mix
  • 3/4 c melted margarine
  • 2/3 + 2/3 can sweetened condensed milk 
  • 1/2 c low-fat milk
  • 1/2 + 1/2 pkg dark chocolate chunks (divide pkg in half for 2 different steps)
  • 1/3 pkg semi-sweet chocolate chips
  • 1/2 pkg mini marshmallows
Topping
  • 1 1/2 c crushed graham crackers or graham cracker crumbs
  • 1/4 c butter or margarine
  • 1/4 c sugar
Directions
  1. Mix the dry cake mix, 2/3 c sweetened  condensed milk and 3/4 c melted margarine and spread in greased 9x13 pan. Bake at 350 degrees for 6 minutes. 
  2. Take out of oven and sprinkle with chocolate chips and mini marshmallows. Put back in oven for approximately 5 minutes, until marshmallows and chocolate chips soften. 
3. In microwave, heat the chocolate chunks and the rest of the sweetened condensed milk for approximately 1 1/2-2 minutes. Stir, adding 1/2 c low-fat milk to smooth, reheating for 30 seconds to soften if necessary.
4. Combine graham wafer topping ingredients and sprinkle half of the mixture over the marshmallows and chocolate chips. 5. Pour the heated chocolate mixture over the wafer topping, then sprinkle the remaining crumbs evenly over  everything.
6. Bake in oven for about 20 minutes, until a knife inserted into the brownie layer at the bottom comes out  clean and the sides are puffed and dry. There will be some melted chocolate and marshmallows on the  knife. Let cool and cut into 2 inch squares with a knife dipped into hot water.


Monday, March 25, 2013

Chocolate Waffles with Mocha Syrup

I'm back! This week, I'll be featuring some fun and festive Easter Brunch dishes. Not all the chocolate has to be in the Easter basket! This one looked too scrumptious to pass up! I found it at www.bhg.com. It's entitled:

Chocolate Waffles with Mocha Syrup


Ingredients
  • 1/2 c butter
  • 3 oz unsweetened chocolate, chopped
  • 1/2 c sugar
  • 2 eggs
  • 1 tsp vanilla
  • 1 c all-purpose flour
  • 2 tsp baking powder
  • 1/4 tsp salt
  • 1 c milk
  • 1 c semisweet chocolate pieces
  • 1 c whipping cream
  • 2 tbsp coffee liqueur
  • 3 c vanilla ice cream

Directions
  1. In medium saucepan, combine butter and unsweetened chocolate. Cook and stir over medium heat until melted and smooth. Remove from heat, Stir in sugar. Add eggs and vanilla, stirring until combined. Stir in flour and baking powder and salt. Whisk in milk until smooth.
  2. Add batter to preheated, lightly greased regular or Belgian waffle maker, according to manufacturer's directions. close lid quickly and do not open  until done. Bake according to manufacturer's directions. When done, use a fork to lift waffle off the grid. Repeat with remaining batter.
  3. For mocha syrup, in a small saucepan, combine semisweet chocolate pieces, whipped cream and coffee liqueur. Cook and stir  on medium heat until mixture is smooth.
  4. Serve waffles warm with ice cream and mocha syrup.


Monday, November 12, 2012

Decadent Chocolate Peanut Butter Cheesecake

I am always browsing online for interesting recipes to share with my friends and readers. Yesterday, I came across this little gem from BHG. Definitely not for the faint of heart or those of us who are dieting (ahem) but certainly something very special to make for a very special occasion. Drool along with me over this "Decadent Chocolate Peanut Butter Cheesecake." Can we say "Yum," boys and girls?
Decadent Chocolate Peanut Butter Cheesecake


Ingredients 
  • 18 chocolate graham cracker squares, finely crushed ( 1-1/c c)
  • 1/2 c butter, melted
  • 2 tbsp sugar
  • 2 8 oz pkgs cream cheese, softened
  • 1 c creamy peanut butter
  • 1/4 c sugar
  • 3 eggs
  • 1 1/2 c semisweet chocolate pieces
  • 2 tbsp milk
  • 1/2 tsp vanilla
  • Peanuts (optional) 
Directions
  1. Preheat oven to 300 degrees F. Combine crackers, melted butter and 2 tbsp sugar. Press into bottom and 1 inch up sides of a 9-inch springform pan; set aside.
  2. In bowl, beat 1 pkg of cream cheese with electric mixer until smooth. Beat in peanut butter and 1/4 c sugar until combined. Fold in 1 lightly beaten egg; set aside.
  3. In saucepan, stir chocolate over low heat until melted and smooth. Remove from heat. Cube remaining cream cheese and add to chocolate. Stir to combine. Stir in milk and vanilla until smooth. Fold in 2 lightly beaten eggs. Spread half the chocolate mixture into the pan. Carefully spread the peanut butter mixture over this layer. Evenly spread with the remainder of the chocolate mixture.
  4. Bake 45 minutes of until top is set when lightly shaken. Outer 2 inches of the pan will look dry and slightly puffed; the center will look darker and wet. 
  5. Cool in pan on rack for 15 min. Use a small sharp knife to loosen crust from sides. 
  6. Cool completely on rack. Cover and chill in fridge for 4 hours. 
  7. Let stand at room temperature for 15 minutes before serving. If desired, sprinkle with peanuts and/or additional chocolate chips. 
Makes 16 servings.

Sunday, May 6, 2012

Chocolate Raspberry Turnovers

These mini turnovers are a whole lot of delicious. Time to buy some phyllo dough and get some truffles from Ethel M chocolates, because it's Turnover Time!

Chocolate Raspberry Turnovers
Chocolate Raspberry Turnovers (Women's Day)


Ingredients
  • 12  sheets phyllo (fillo) dough (each about 14 x 9 in.), thawed if frozen*
  • 18 Ethel M's milk or dark chocolate truffles
  • 1/2 pint(s) fresh raspberries
  • nonstick cooking spray or melted butter

Directions
  1. Heat oven to 375°F. Have a baking sheet ready. Unfold dough; cover with plastic wrap to prevent drying.
  2. Remove 1 sheet phyllo; lightly coat with nonstick spray or brush with melted butter. Fold in thirds lengthwise; lightly spray or brush top. Place 1 piece chocolate about 1/2 in. from bottom end of strip; top with 1 raspberry. Fold lower right corner over filling, forming a triangle. Continue folding triangles to other end of strip. Place on baking sheet. Repeat to make 12.
  3. Bake 10 to 12 minutes until golden. Remove to a wire rack to cool. Melt remaining 6 pieces chocolate in microwave; drizzle over turnovers. Serve warm or at room temperature. Garnish with remaining raspberries.

*Note: You can also use puff pastry or croissant dough for these. Follow package directions.

Chocolate Raspberry Trifle

Chocolate Raspberry Trifle
From our friends at Women's Day
This is a decadent, delicious, absolutely chocolaholic/berry-fanatic divine dish to serve up for very special occasions. The use of liqueur, chocolate and raspberries is inspired. I can't wait to try this one out! Think: Mother's Day. From our friends at Women's Day.


Ingredients

  • 1/3 cup(s) dark crème de cacao liqueur or dark rum
  • 1/3 cup(s) brewed black coffee or water
  • 2 tub(s) (22 oz each) refrigerated chocolate pudding
  • 1 cup(s) reduced-fat sour cream
  • 2 cup(s) heavy (whipping) cream, well chilled
  • 3 tablespoon(s) confectioners’ sugar
  • 1  chocolate-marble loaf or pound cake (14 oz), cut in 16 thin slices, slices cut in half
  • 1 bar(s) (3.5 oz) bittersweet chocolate, shaved with a vegetable peeler or coarse grater
  • 3  baskets (1⁄2 pt each) red raspberries (reserve 8 berries for garnish)


Directions
  1. Have ready a 3-qt trifle bowl or clear glass serving bowl (about 8-in. diam), preferably straight-sided.
  2. Mix liqueur and coffee in a clear 1-cup measure. Combine pudding and sour cream in a medium bowl. In a large bowl, beat cream and confectioners' sugar with mixer on high speed until stiff, billowy peaks form when beaters are lifted.
  3. Arrange half the cake slices in bottom of trifle bowl; drizzle with 1⁄2 the liqueur mixture. Spread with 1⁄2 the pudding mixture; sprinkle with 1⁄3 the chocolate shavings. Top with 1⁄2 the raspberries, then 1⁄2 the whipped cream. Repeat layers (reserve remaining shavings for garnish). Cover bowl with plastic wrap. Refrigerate at least 8 hours or up to 1 day.
  4. Sprinkle with remaining chocolate shavings; garnish with reserved berries.


Sunday, March 25, 2012

Truffle Easter Eggs

I love truffles, especially those designed for holidays and special occasions. Here's a recipe from tasteofhome.com that has a hint of hazelnut and is beautiful when completed. It's an attractive and tasty addition to your Easter table! As with any truffles, follow the directions carefully and take your time. They are not difficult to make, just a bit time-consuming. I have included some hints to help you prepare and finish the eggs. 


Truffle Eggs
Originally from tasteofhome.com. Adapted
Ingredients

  • 1/4 c heavy whipping cream
  • 1 tbsp butter
  • 1/2 tsp light corn syrup
  • 6 oz semisweet chocolate chips
  • 4 tbsp Nutella
  • blue or white candy coating melts (disks) from Wilton or JoAnn's 
  • 5-6 drops blue food coloring or gel if using white disks
  • 1/2 to 1 tsp instant coffee granules
  • Flaked coconut, toasted, optional for nest, or make Rice Krispie nests
Note: You can add some peanut butter and Rice Krispies or granola if you find the texture too soft or runny to form the eggs properly.

Directions
  1. In a saucepan, bring the cream, butter and corn syrup to a boil. Add chocolate chips and remove from heat (don't stir). Let stand for 5 minutes. Whisk in Nutella (and peanut butter and krispie cereal or granola if desired) until combined. Transfer to small bowl.Cover and refrigerate for 45-60 minutes, until thickened, stirring every 15 minutes.
  2. Shape 1 heaping tsp of chocolate mixture into an egg. Place on a parchment paper-lined baking sheet.Repeat with remaining mixture. Freeze until firm (check after 10 minutes or more)
  3. Meanwhile, in a microwave-safe bowl, melt the candy disks and stir until cool. Stir in food coloring (if desired). Dip frozen eggs in the candy coating, keeping them frozen until ready to dip, allowing extra to drip off. Return to baking sheet and immediately sprinkle lightly with coffee granules (alternately, fleck a pastry brush covered with melted chocolate over each egg to speckle them). Let stand until set. Store in an airtight container in the refrigerator. Serve eggs on a nest of toasted coconut or in a Rice Krispie nest, if desired. Yields about 3 dozen eggs.

Saturday, February 4, 2012

Zebra Domes: a taste of Africa

Here is the first of some absolutely delicious treats from Walt Disney World. We fell in love with this treat on a culinary tour of Boma at Jambo House..


Zebra Domes
From Animal Kingdom Lodge
Yield: 16 servings

Ingredients:
1 pound milk chocolate
¼ cup espresso coffee
5 egg yolks
¼ cup + 1 tablespoon sugar
6 sheets gelatin
½ cup Kahlua Liqueur
4 cups heavy cream
¾ cup white chocolate ganache
¼ cup dark chocolate ganache

Directions:
1. Melt milk chocolate.
2. Whip heavy cream to soft peaks.
3. Mix yolks with sugar.
4. Soften gelatin leaves in cold water.
5. Mix gelatin with Kahlua and coffee. Set bowl over hot water bath to dissolve the gelatin.
6. Fold 1/3 of whipped cream into the chocolate.
7. Add the yolks, then the gelatin mixture.
8. Fold in the rest of the cream.
9. Pour mousse in flexipan domes almost to the top.
10. Place sponge circle (1/4" thick yellow cake cut in a circle) on top. Leave in the freezer to set.
11. Once hard, unmold and place in glazing racks.
12. Make white chocolate ganache and chocolate ganache.
13. Put chocolate ganache in a pastry bag. Ladle white chocolate ganache to cover each dome. Simultaneously, pipe a stripe design of chocolate ganache over the dome.
14. Refrigerate to allow the glaze to set.
15. Decorate the bottom edge with coffee crunch.
16. Place a chocolate covered coffee bean on the center of each dome.
Note: One sheet of gelatin is equal to one teaspoon of unflavored powdered gelatin dissolved in ¼ cup of water.

Ganache
Ingredients
9 oz bittersweet chocolate (or white chocolate), chopped
1 c heavy cream
1 tbsp dark rum (or Kahlua for this recipe)

Directions
  1. Place the chocolate into a medium bowl. Heat the cream in a small sauce pan over medium heat. Bring just to a boil, watching carefully so it doesn't overflow the pot. When the cream comes to a boil, pour over the chopped chocolate and whisk until smooth. Stir in liquor (if desired). 
  2. Allow the ganache to cool slightly before covering cake or cookies, starting at the center of the cake and working outside. You can also allow it to cool until thick and then whip with a whisk until fluffy to use in other recipes.

Friday, January 13, 2012

Classic Creamy Red Velvet Cookies

Here is a recipe just right for Valentine's Day! It's got all the elements of a "red velvet cake" in a cookie, with cream cheese frosting and a truly delicious taste. I found this at the Betty Crocker website, and had to share it with you. Remember, not all recipes have to be created "from scratch!"  Sometimes we can all use a little help. A delicious time-saver!

Red Velvet Cookies
From the Betty Crocker website


Ingredients:
  • 1 pouch Betty Crocker sugar cookie mix
  • 1/3 c unsweetened cocoa
  • 1/4 c butter or margarine, softened
  • 1/4 c sour cream
  • 1 tbsp red food coloring
  • 1 egg
  • 3/4 to 1 c Betty Crocker cream cheese frosting
  • 1/4 c chopped nuts (preferably walnuts or pecans)
Preparation
  1. Heat oven to 375°F. In large bowl, stir cookie mix, cocoa, butter, sour cream, food color and egg until soft dough forms.
  2. Roll dough into 1-inch balls; place 2 inches apart on ungreased cookie sheet.
  3. Bake 8 to 9 minutes or until set. Cool 2 minutes; remove from cookie sheet to wire rack. Cool completely, about 15 minutes.
  4. Frost cooled cookies with frosting. Sprinkle with nuts. Store tightly covered at room temperature.
Makes 36 cookies

Saturday, November 12, 2011

Nobody Knows the Truffles I've Seen Chocolate Truffles

Bad joke but it's true. I've been researching truffles and this one sounds pretty fool-proof and rather fun. The original recipe called for a whole bag of Oreo Cookies <Gak!>. To me, that is just a bit sweet with the other ingredients, so I toned it down with a box of chocolate Graham Wafer or plain chocolate wafer cookie crumbs instead. Try whichever you prefer.

Chocolate Truffles
Ingredients

  • 1 pkg (8 oz) Philadelphia Cream Cheese, softened
  • 1 pkg (16.6 ox) OREO Cookies, finely crushed (about 4 1/4 c), divided OR the same amount of Chocolate Graham Wafer Crumbs or plain chocolate wafer cookie crumbs
  • 2 Pkg (8 squares each) BAKER's Semi-Sweet Chocolate, melted  
  • NOTE: if desired: cocoa powder, chocolate shot (cake decorations) or sprinkles
Directions
  1. Mix cream cheese and 3 c cookie crumbs (or alternate choice) until well blended.
  2. Shape into 48 (1 inch) balls. Dip in melted chocolate. If desired, roll in toppings such as cocoa powder, chocolate shot or colored sprinkles, or simply sprinkle with remaining cookie crumbs.
  3. Refrigerate for 1 hour or until firm. Store in tightly covered container in fridge. 
HINTS
To melt chocolate: place unwapped chocolate squares in microwaveable bowl. Microwave on high for 2 minutes, stir and keep melting at 30 second intervals until completely melted. If using white chocolate, use medium heat and check after 1 1/2 minutes.
To dip truffles: Place several truffles in a bowl of melted chocolate. Use two forks to roll the truffles, letting the excess chocolate drip back into the bowl. The same forks can be used to gently roll the truffles in toppings, if desired, before placing on a saran wrap-, parchment- or wax paper-lined baking sheet; let stand until firm. 

Million Dollar Fudge

Now we get into true chocolate decadence - fudge! I love fudge and so does Mike, so this is an absolute "yes" for Christmas baking. Here's a wonderful recipe that I got from  allrecipes.com a while back. It has "it" all and just a little bit more.

Million Dollar Fudge
Ingredients:

  • 4 1/2 c white sugar
  • 1 pinch salt
  • 2 tbsp butter
  • 1 (12 fl oz) can evaporated milk
  • 2 c chopped nuts (preferably walnuts or pecans)
  • 1 (12 oz) pkg semisweet chocolate chips
  •  12 (1 oz) squares German Sweet chocolate
  • 2 c marshmallow creme
Directions
  1. Butter two 9x9 inch baking pans and set aside
  2. Place chocolate chips, German chocolate, marshmallow creme and nuts into large mixing bowl. Set aside.
  3. In a 4 qt. saucepan, combine sugar, salt, butter and evaporated milk. Stir over low heat until the sugar dissolves. Bring to boil and cook for 6 minutes.
  4. Pour boiling syrup over ingredients in the bowl; beat until all chocolate is melted. Pour into prepared pans. Let stand a few hours to set before cutting.
Note: Great for bake exchanges or to put together with other baking or treats for teachers or friends. Keeps well in a covered tin box lined with wax or parchment paper.

Saturday, October 29, 2011

Chocolate Dipped Strawberries and More

Now it's time to have some fun with simple yet elegant dining ideas. The first thing that comes to mind is chocolate-dipped strawberries, and since the creation of these is part of my job, I know a bit about the process.

When you dip strawberries in chocolate, one of the most important things is the temperature of the chocolate. Another consideration is the quality of the chocolate you use. Chocolate wafers (available at stores such as Michaels and JoAnn's or Wilton) are preferable to the baking chocolate or chocolate chips that you find at grocery stores. Lesser-grade chocolate contains vegetable oil that can cause a waxy film and taste to the finished product. And since these are meant to be "elegant" you want them to look their best. This also means keeping the temperature of the dipping chocolate between 85 and 90 degrees, so it is properly tempered and keeps its glossy finish.

Chocolate Dipped Strawberries
    <photo courtesy of rf123.com>
Ingredients

  • Fresh whole ripe, unblemished strawberries (preferably with stem for dipping)
  • Chocolate - as fine a grade as you can afford for melting (solid bar chocolate, grated or chocolate wafers are preferable)
  • Food gel or paste food coloring (regular food coloring causes chocolate to thin and isn't as effective color-wise)
  • Other ideas (as offered below recipe)*
Method
  1. Lay a tray or plate covered with waxed paper on your work surface.
  2. Melt milk or dark chocolate in a heat-proof bowl in the microwave at 70% power for approximately 1 minute. Stir and continue heating if not smooth and creamy in appearance OR
  3. Melt white chocolate at 50% power in a heat-proof bowl in the microwave and check after 30 seconds to ensure it's melting, not scorching. Continue heating until it's smooth and creamy in appearance. It won't take long. White chocolate scorches very easily and this causes it to cake rather than to melt smoothly. 
  4. Add food gel or paste, a small dab at a time, to a portion of the white chocolate to get the color you desire 
  5. Wash and pat dry the berries, pulling the leaves upward toward the stem gently so they don't get in the chocolate (this creates a "handle" with which to do the dipping)
  6. Dip one berry at a time in the bowl of chocolate, gently swirling it to ensure the entire berry is coated. Cover just about to the top, excluding leaves and stem. Hold upright and let the excess chocolate drip from the tip of the berry. Gently bend leaves back down to give a natural appearance.
  7. Lay the berry on the waxed paper (or, even better, hold the berry by the "handle" with one hand and gently drizzle chocolate from a small spoon or paper cone to decorate. A quick side to side sweep of a small stream of chocolate looks most effective as a drizzle. If you prefer, you can drizzle a thicker stream of chocolate up and down to give a striped effect
  8. If desired, drizzle the berry with a contrasting color and then allow to harden in the fridge for approximately 10-15 minutes (or more)
  9. For creative effect, after drizzling with more than one color of chocolate, use a swizzle stick or pick to gently draw the chocolate upward toward the stem, creating a swirl effect. Good for contrast.
  10. Have fun experimenting! That's the whole idea behind this activity!
*Other dippers for strawberries:
  • Sour cream and brown sugar
  • Melted chocolate and crushed nuts
  • "half and half" - half the berry in white chocolate and half in dark chocolate (tuxedo effect)
  • yogurt and granola with dried berries
  • caramel or fudge ice cream topping
  • vanilla frosting and toasted coconut
You can also dip maraschino cherries, bananas (whole or cut in half), pineapple spears, regular marshmallows, cut-out Rice Krispie square pieces and pound cake chunks in left-over chocolate to make a beautiful plate. Dipping half of the item and leaving the rest undipped makes a beautiful effect. Place on waxed paper and allow to harden in the fridge with the strawberries before serving on a white or black ceramic plate. 

How's that for simple elegance?

Sunday, October 23, 2011

White Chocolate Fudge

This recipe has been adapted from one originally found on kraft.com blended with one in an old Carnation cookbook, to create a fudge that we prefer. Once again it's a case of experimenting with a variety of recipe ideas and just plain good luck. Baking is part science, part magic and part taking chances. When making any candy, use the best possible chocolate you can afford - a quality chocolate bar, pure chocolate wafers from a baking supply store or the chocolate coins we sell at our store - as a base. 


White Chocolate Fudge
                                                                   Adapted from an old Carnation Cookbook                                       
Ingredients
  • 2 pkg (6 squares each) of BAKER's White Chocolate or an equivalent amount of quality white chocolate
  • 3/4 cup canned sweetened condensed milk*
  • 1 c coarsely chopped almonds OR walnuts OR hazelnuts OR pecans OR pistachios - toasted {spread nuts flat on a cookie sheet and lightly browned in 350 degree oven for 10 to 15 minutes; chop after heating}
  • 1/2 c dried cranberries OR finely chopped red and green maraschino cherries OR crushed candy canes
  • 1 Tbsp orange zest {the finely grated outer peel of a washed and dried orange}

Directions
  1. Line an 8 inch square pan with foil, extending the ends over the sides. 
  2. Microwave chocolate and milk in a microwave safe bowl on HIGH for 2 to 3 minutes, until chocolate is almost melted. Then stir until completely melted.
  3. Add remaining ingredients, mix well. Spread over pan and refrigerate 2 hours or until firm.
  4. Use excess foil overlapping the ends as "handles" to lift the fudge from the pan before cutting it to serve.
*Reserve remaining milk in a covered container and use in tea, coffee or for another baking  recipe.

Saturday, October 22, 2011

Mint Sundae Brownie Squares

Mint Sundae Brownie Squares 


The brownie mix helps save time but please see below for an excellent brownie recipe to use for this dessert. If you choose to use a brownie mix, simply follow the directions given. If you prefer home-made, simply follow steps 3 and 4 from the first recipe after you have made your own fudge brownies.


Ingredients

  • 1 package fudge brownie mix (13-inch x 9-inch pan size)
  • 3/4 cup chopped walnuts
  • 1 can (14 ounces) sweetened condensed milk
  • 2 teaspoons peppermint extract
  • 4 drops green food coloring, optional
  • 2 cups heavy whipping cream, whipped
  • 1/2 cup miniature semisweet chocolate chips
  • 1 jar (16 ounces) hot fudge ice cream topping, warmed
  • 1/3 cup chopped salted peanuts (if desired)

Directions Using Brownie Mix
  1. Prepare brownie mix according to package directions. Stir in walnuts.
  2. Pour into a greased 13-in. x 9-in. baking pan. Bake at 325° for 23-27 minutes or until a toothpick inserted in the center comes out clean (do not over bake). Cool on a wire rack.
  3. Meanwhile, in a large bowl, combine the milk, extract and food coloring if desired. Fold in whipped cream and chocolate chips. Spread over brownie layer. Cover and freeze for several hours or overnight.
  4. Let stand at room temperature for 10 minutes before cutting. Drizzle brownies with ice cream topping; sprinkle with peanuts if desired. Please remember that many people are allergic to peanuts! Yield: 15 servings.
Home-Made Fudge Brownies - rich and delicious
 
Ingredients
  • 7 oz - 99 percent cocoa chocolate or unsweetened chocolate, coarsely chopped
  • 3/4 c butter
  • 1/4 c water
  • 1 c granulated sugar
  • 3/4 c packed brown sugar
  • 2 eggs
  • 1 tsp vanilla
  • 1 1/3 c all-purpose flour
  • 1/8 tsp salt
  • 1/8 tsp ground cinnamon
Directions
  1. Lightly grease a 9x9x2 inch baking pan. Set pan aside. Preheat oven to 350 degrees F.
  2. In a large microwave-safe mixing bowl, combine chocolate, butter and water. Microwave, uncovered,  on 100 percent power (high) for 2 to 3 minutes or until butter is melted, stirring once or twice. 
  3. Remove bowl from microwave and stir until chocolate is completely melted. If desired, you can combine chocolate, butter and water in a medium saucepan and heat (stirring) over low heat until chocolate is melted. Transfer to mixing bowl.
  4. Beat in granulated sugar and brown sugar with electric mixer on low to medium speed until combined. Add eggs and vanilla. Beat on "medium" for 2 minutes. Add flour, salt and cinnamon.  Beat on low speed until combined.
  5.  Spread batter in prepared pan. Bake for approximately 25 minutes, until a toothpick inserted near the center comes out clean. Allow to cool.
  6. Follow steps 3 and 4 in previous recipe.