Showing posts with label Slices and squares. Show all posts

Saturday, January 20, 2024

CHOCOLATE PEANUT BUTTER MARSHMALLOW SQUARES (aka CONFETTI SQUARES)

 CHOCOLATE PEANUT BUTTER MARSHMALLOW aka CONFETTI SQUARES

True confessions: I didn't take a photo of just my chocolate/marshmallow/peanut butter squares (aka "confetti") so I am sharing a photo of our Christmas Cookie "Tree" display. Lots of goodies on there - some recipes I have previously shared, some yet to come. But anyway, this is our variety, and if you look carefully, on the bottom part of the cookie stand, you can see (left to right), cherry coconut slice, spritz cookies and yes, lurking to the right my ultimate favorite, chocolate confetti. So easy, so much fun to make a SO delicious!

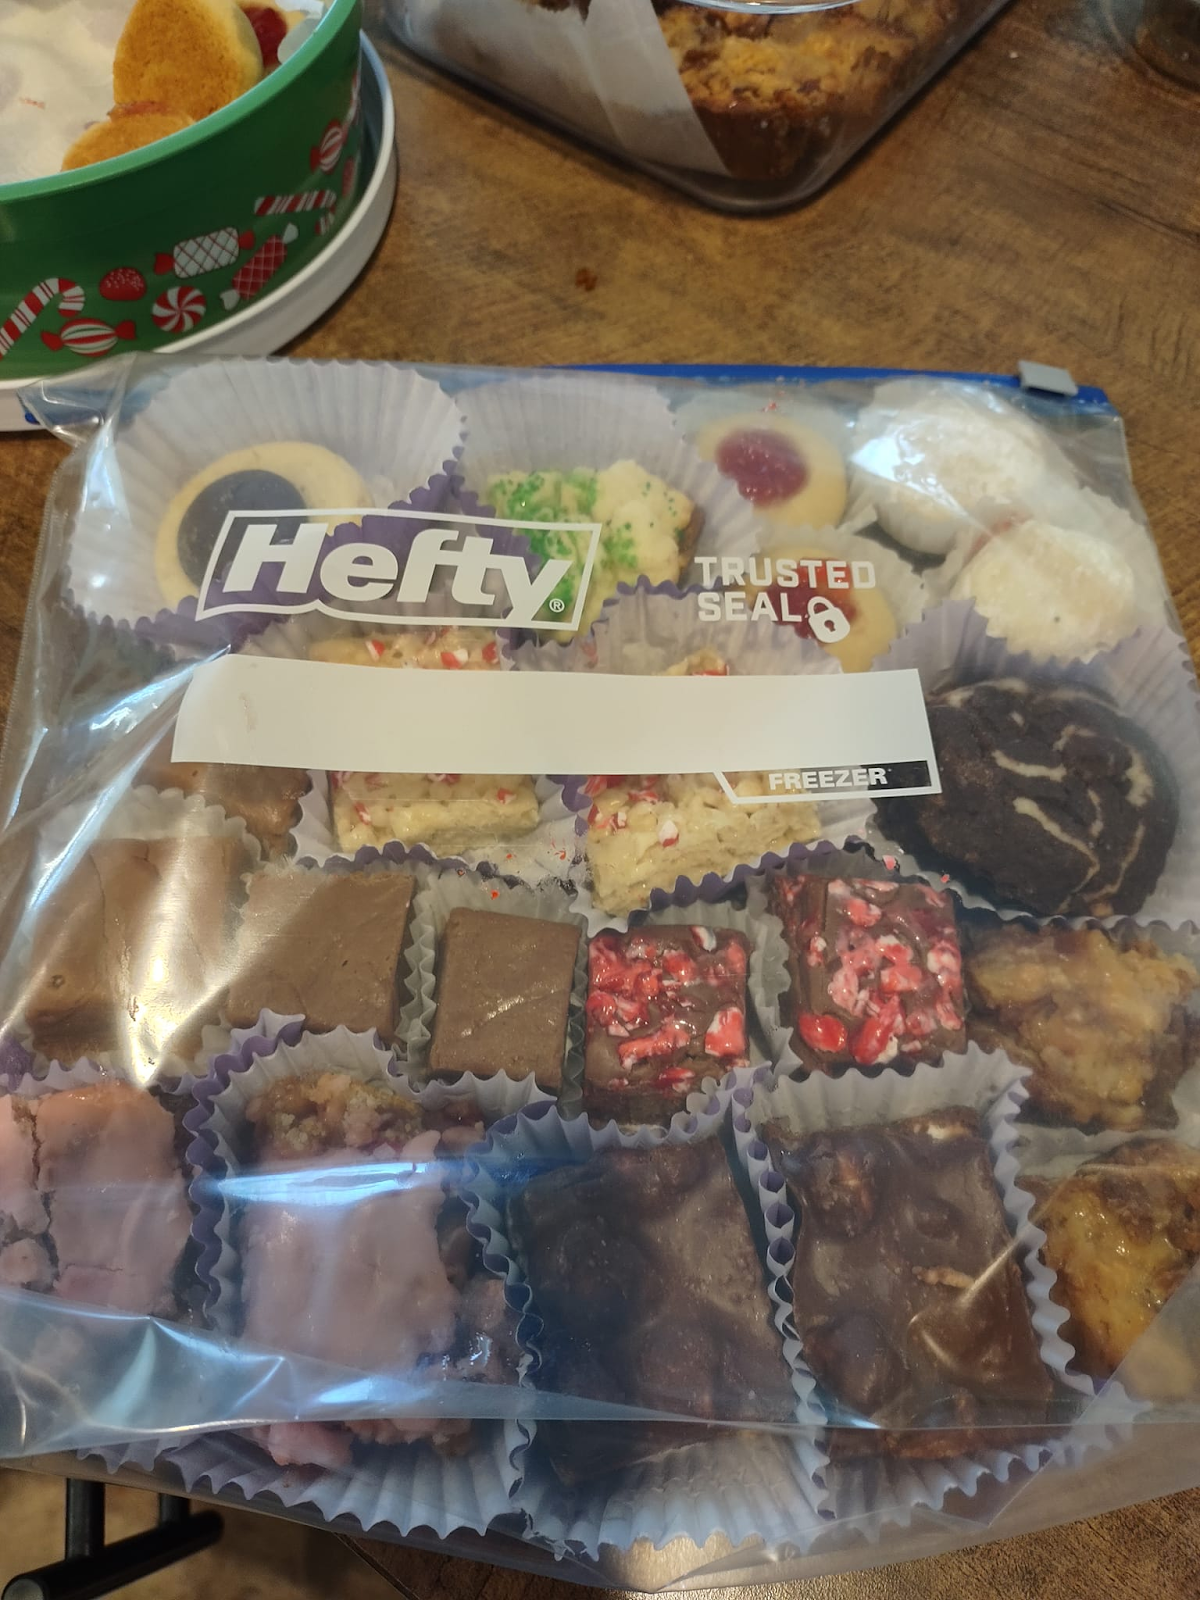

I decided to get smart and make stacking the dang thing a bit easier, so I packaged the variety of baking, tucked into cupcake liners, into freezer bags for easier filling. We do love our cookies! The Chocolate Marshmallow Squares have a prominent place on the bottom right of the bag since I like big chunks of this square - ok I admit it, it is an addiction! But the packed bag is so pretty that I had to share it, too. Just think, all the years I have done Christmas baking and have never thought of this little time and space-saver! Whoah!


So, what is the difference between "Chocolate Confetti" and Chocolate Peanut Butter Square? In my opinion, "Confetti" uses colored mini marshmallows while my square uses white marshmallows. Traditionally, Confetti uses milk chocolate chips while my square - this year - was a mix of half dark and half milk chocolate, which made all the difference. Whichever you prefer, all I know is that I have trouble stopping at one piece, hence only having 2 on the tray at once! Oh, and I prefer making it in a foil pan lined with foil so it's easier to remove and cut without issue. Just a little hint there. This year, I also added about half a cup of marshmallows to the pot while the mixture was still quite warm, so they added a bit of gooeyness, a chewier texture that we liked.


INGREDIENTS:

  • 1/4 c unsalted butter
  • 1/2 c cup creamy peanut butter
  • 3/4 c semi-sweet chocolate chips
  • 3/4 c dark chocolate chips (or use all milk or semi-sweet if you prefer)
  • 5 c white mini marshmallows (rainbow marshmallows for Confetti slice)
DIRECTIONS:
  1. Line an 8x8 or 9x9 foil pan (or baking pan) with aluminum foil. 
  2. In a medium saucepan, over low heat, combine butter, peanut butter and chocolate chips. Melt, stirring until smooth and completely combined.
  3. Remove from heat and stir in 1/c marshmallows - just for the square, not the Confetti.
  4. Let cool slightly and then mix in the remainder of the marshmallows.
  5. Spread in prepared pan and let set at room temperature. 
Note: The slice can be frozen at this point, but I find it much more attractive if sliced into squares with a sharp knife when set, then stored in the freezer in a freezer bag (as pictured above). Don't forget to save a few slices for the baker and a helper to sample! SOMEONE has to taste-test the goods!


Tuesday, August 7, 2018

8-Layer or Magic Bars

                                                                 Image may contain: food

Hi! I'm baaaack with more favorite recipes that I have been perfecting for the last while. This is my husband's absolute favorite. Some folks call them 7-Layer Bars while others call them Magic Bars. In my opinion, I would rather eat them than quibble so let's get down to some serious baking! And why are my bars called 8-Layer instead of 7-Layer? Because they have an extra-special something something that makes them even more delectable - if that is even possible!

8 Layer Bars
The inside story
Ingredients
  • 1 1/2 c graham wafer crumbs
  • 1 stick (1/2 c) butter
  • 3/4 pkg semi sweet chocolate chips
  • 3/4 pkg salted caramel or butterscotch chips
  • 3/4 pkg white chocolate chips
  • 1/2 c chopped walnuts
  • 1/2 c chopped pecans
  • 1 pkg coconut flakes or shredded coconut - sweetened or unsweetened
  • 1 x 14 oz can of sweetened condensed milk - regular not low fat
How-To: 
Preheat oven to 350 degrees before starting. Line 9x13 inch pan with foil or parchment paper.
*True confessions: I made the mistake of lining the pan with foil and attempted to mix the graham wafers and melted butter right in the pan. Big mistake: ripped foil, messy results but so good!*
  1. Melt stick of butter in the microwave for about 20 seconds. Check and melt a bit more if necessary.
  2. Stir in the graham wafer crumbs with a fork and then press into a foil-lined 9x13 inch pan. (You can also use parchment paper but I find foil easier to fuss with)
  3. Sprinkle chocolate chips evenly over the crumb mixture
  4. Sprinkle caramel (or butterscotch) chips evenly over the chocolate chips
  5. Sprinkle white chocolate chips over the caramel chips (trust me, these make all the difference)
  6. Sprinkle first the walnuts and then the pecans over the top
  7. Sprinkle the coconut over the whole mess of deliciousness. Make sure all is covered with it.
  8. Drizzle the whole thing evenly with the can of sweetened condensed milk. Don't leave gaps - the bars don't like that (just kidding - it's almost impossible to get it perfect but do your best)
Bake in the preheated oven for approximately 30 minutes or so. The top should be slightly golden with darker gold edges (see the picture). This gives the best results. DO NOT even think about cutting this until it's thoroughly cool - or at least cool enough to not fall apart when you use a serrated knife run under hot tap water to cut it. If you use a better grade of foil than I did you should be able to pull the whole thing out of the pan. This is why we always put the foil slightly higher than the pan's edges, my friends. 

Enjoy....but I don't have to tell you that. If you cut it in many pieces - I call them 2-bite pieces while my hubby calls them "more" - you can get at least a couple to three dozen slices. I kept some out and froze the rest in 2 different freezer container, for the sake of self-control. They "keep" very well.

Saturday, April 14, 2012

A Little Slice of Heaven (aka The Pink Slice)

A Little Slice of Heaven (aka The Pink Slice)

Here's a light and unusual slice that has it all: peanut butter, coconut, peanut butter and even my favorite fruity little marshmallows! All covered with a yummy butter cream icing. How can you go wrong? Although the creator calls it "The Pink Slice," I prefer to think of it as "A Little Slice of Heaven." Be prepared: you may want to make a little extra frosting...


Ingredients

  • 1/2 c butter or margarine
  • 1 pkg butterscotch chips
  • 1 c finely grated coconut
  • 1 c peanut butter
  • 1 pkg multicolored marshmallows
Icing
  • 2 c powdered sugar
  • 1 Tbsp butter or margarine
  • 3 drops red food coloring or a little squeeze of gel coloring
  • milk, enough to make a soft consistency of icing
Directions
  1. Melt and cool slightly the 1/2 c of butter and package of butterscotch chips
  2. Add coconut, peanut butter and marshmallows. Mix well.
  3. Press into a greased 9x9 pan.
  4. Icing: Mix powdered sugar and remaining butter. Add milk until desired consistency. Add red food coloring to make a pretty pink. Spread over squares before chilling. Freezes well.


Saturday, October 22, 2011

Mint Sundae Brownie Squares

Mint Sundae Brownie Squares 


The brownie mix helps save time but please see below for an excellent brownie recipe to use for this dessert. If you choose to use a brownie mix, simply follow the directions given. If you prefer home-made, simply follow steps 3 and 4 from the first recipe after you have made your own fudge brownies.


Ingredients

  • 1 package fudge brownie mix (13-inch x 9-inch pan size)
  • 3/4 cup chopped walnuts
  • 1 can (14 ounces) sweetened condensed milk
  • 2 teaspoons peppermint extract
  • 4 drops green food coloring, optional
  • 2 cups heavy whipping cream, whipped
  • 1/2 cup miniature semisweet chocolate chips
  • 1 jar (16 ounces) hot fudge ice cream topping, warmed
  • 1/3 cup chopped salted peanuts (if desired)

Directions Using Brownie Mix
  1. Prepare brownie mix according to package directions. Stir in walnuts.
  2. Pour into a greased 13-in. x 9-in. baking pan. Bake at 325° for 23-27 minutes or until a toothpick inserted in the center comes out clean (do not over bake). Cool on a wire rack.
  3. Meanwhile, in a large bowl, combine the milk, extract and food coloring if desired. Fold in whipped cream and chocolate chips. Spread over brownie layer. Cover and freeze for several hours or overnight.
  4. Let stand at room temperature for 10 minutes before cutting. Drizzle brownies with ice cream topping; sprinkle with peanuts if desired. Please remember that many people are allergic to peanuts! Yield: 15 servings.
Home-Made Fudge Brownies - rich and delicious
 
Ingredients
  • 7 oz - 99 percent cocoa chocolate or unsweetened chocolate, coarsely chopped
  • 3/4 c butter
  • 1/4 c water
  • 1 c granulated sugar
  • 3/4 c packed brown sugar
  • 2 eggs
  • 1 tsp vanilla
  • 1 1/3 c all-purpose flour
  • 1/8 tsp salt
  • 1/8 tsp ground cinnamon
Directions
  1. Lightly grease a 9x9x2 inch baking pan. Set pan aside. Preheat oven to 350 degrees F.
  2. In a large microwave-safe mixing bowl, combine chocolate, butter and water. Microwave, uncovered,  on 100 percent power (high) for 2 to 3 minutes or until butter is melted, stirring once or twice. 
  3. Remove bowl from microwave and stir until chocolate is completely melted. If desired, you can combine chocolate, butter and water in a medium saucepan and heat (stirring) over low heat until chocolate is melted. Transfer to mixing bowl.
  4. Beat in granulated sugar and brown sugar with electric mixer on low to medium speed until combined. Add eggs and vanilla. Beat on "medium" for 2 minutes. Add flour, salt and cinnamon.  Beat on low speed until combined.
  5.  Spread batter in prepared pan. Bake for approximately 25 minutes, until a toothpick inserted near the center comes out clean. Allow to cool.
  6. Follow steps 3 and 4 in previous recipe.


Friday, October 21, 2011

Nana's Rhubarb Cake

Crispy, tart/sweet and absolutely delicious!

Nana's  Rhubarb Cake


Ingredients

·                                 1 1/2 cups white or golden brown sugar
·                                 1 teaspoon baking soda
·                                 1/2 teaspoon salt
·                                 2 cups all-purpose flour
·                                 2 eggs, beaten
·                                 1 cup sour cream
·                                 3 cups diced rhubarb (fresh or frozen)
·                                  
·                                 1 cup white sugar
·                                 1/4 cup butter, softened
·                                 1/4 cup all-purpose flour
·                                 ground cinnamon, for dusting

Directions

1.       Preheat the oven to 350 degrees F (175 degrees C). Grease and flour a 9x13 inch baking dish.
2.       In a large bowl, stir together 1 1/4 cups sugar, baking soda, salt and 2 cups flour. Stir in the eggs and sour cream until smooth, then fold in the rhubarb. Pour into the prepared dish and spread evenly. In a smaller bowl, stir together the remaining 1 cup sugar and butter until smooth. Stir in 1/4 cup flour until the mixture is crumbly. Sprinkle the mixture on top of the cake then dust lightly with cinnamon.
3.   Bake in the preheated oven until a toothpick inserted in the center comes out clean, about 45 minutes.


Rhubarb is part of our staple diet in Winnipeg. Every garden has either a rhubarb or strawberry rhubarb garden! Unfortunately it can't be grown in the desert, so we have to resort to frozen. This recipe has been adapted from several in my Mennonite cookbook.

Apple Raisin Strudel

Apples and raisins combined in flaky pastry. How can you possibly go wrong? Yum!


Puff Pastry Apple & Raisin Strudel


Total Time:  1 hr 0 min


Ingredients

·         2 large Golden Delicious apples, peeled, cored and sliced 1/8 to 1/4-inch thick
·         1 lemon, juiced
·         1 cup raisins (softened for approximately 20 minutes in hot water, then drained)
·         1/4 cup sugar, plus 3 tablespoons and 1 tsp ground cinnamon
·         2 tablespoons cold butter, cut into small pieces, plus 2 tablespoons butter, melted
·         All-purpose flour, for dusting
·        1 sheet frozen puff pastry, thawed (available at most supermarkets)

Directions

  1. Position an oven rack in the center of the oven and preheat to 375 degrees F
  2. In a medium bowl, toss the sliced apples with the lemon juice until the apples are thoroughly coated.
  3. Add the softened raisins, 1/4 cup sugar and the 2 tablespoons cold cubed butter. Toss well. Set aside
  4. Lightly dust the counter or work surface with flour. Lay the puff pastry on top and dust the rolling pin with additional flour. Gently roll the puff pastry to 1/8-inch thickness
  5. Spread the apple and raisin mixture over the bottom half of the puff pastry square leaving about 1-inch of space along the side edges. Fold the top half of the puff pastry over and pinch to seal the edges together.
  6. Brush strudel with melted butter and sprinkle with cinnamon and reserved sugar. 
  7. Using a serrated knife, make several diagonal slits along top of strudel.
  8. Place on parchment paper-lined baking sheet and bake for 40 minutes, rotating halfway through to ensure even browning. Bake until puffed and golden. Adapted from my Mennonite Cookbook.

Variations on the theme
Cranberries  and apples make an ideal combination near Christmas, as do strawberries and rhubarb during summer.