Showing posts with label Family Favorites. Show all posts

Monday, January 6, 2025

                                       Cheesy Potato Cassserole

                                                     (aka "Funeral Potatoes"}


This is an easy, tried, and true recipe (thanks to my friend, Dona) that is perfect for a special meal, a treat for your family, or especially for a potluck! The ingredients are reasonable in cost, the prep time is quick and all you have to remember is to give it a bit more time in the oven if your stove is as slow as mine. It got a rave review at our last potluck here at our complex.


Ingredients

1lb package of shredded hashbrowns

1  can of Condensed Cream of Potato Soup

16 oz tub of sour cream

 2 c shredded Cheddar Cheese 

1/4 c green onions

1 tsp salt  (approx.)

1/2 tsp pepper

Optional: 1/2 c of crushed French Onions


Preparation

Butter or spray a 13x9-inch baking pan or casserole dish. Preheat oven to 350 degrees. Mix all the ingredients together. Pour into the pan and cover with foil. Bake for approximately 45 minutes to one hour. Remove foil and allow to brown for 15 minutes. PLEASE NOTE: Topping with panko, crushed cornflakes, or French Onions before baking adds a bit of a crunch! 


Sunday, January 30, 2022

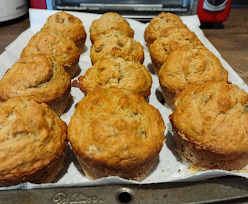
Totally Delicious Banana Walnut Muffins


This recipe is simple and the result is well worth it! These were about the best banana muffins I have made and surprise! I actually had all the ingredients in the house! If you can't eat nuts, they are just as good without them but there is something about bananas and walnuts that is almost magical...

Totally Delicious Banana Walnut Muffins
Ingredients
  • 1 1/2 c all-purpose flour (plus a couple of tbsp to dust pans if necessary)
  • 1 tsp baking powder
  • 1 tsp baking soda
  • 1/2 tsp salt
  • 1 tsp ground cinnamon
  • 1/4 tsp ground nutmeg
  • 3 large bananas, mashed
  • 6 tbsp melted butter: sweet or salted
  • 2/3 c brown or golden brown sugar
  • 1 large egg
  • 1 tsp vanilla extract
  • 2 tbsp milk
  • 1/2 - 1 c chopped walnuts, pecans or chocolate chips (if desired)
Instructions
  1. Preheat oven to 425 degrees. Prepare a medium muffin pan by either spraying it with cooking spray, using cupcake liners or using melted butter to coat each cup then dusted with enough flour to just coat.
  2. In a medium bowl, whisk flour, baking powder, baking soda, cinnamon and nutmeg together . Set aside.
  3. In a large bowl, mash bananas. Using a spatula or wooden spoon (or mixer if you prefer), mix in the melted butter, brown sugar, egg, vanilla extract and milk.
  4. Pour the dry ingredients into the moist ingredients and continue stirring until combined and no dry bits remain. Then add nuts and/or chocolate chips. The batter will be quite thick.
  5. Spoon the batter into cups (prepared as directed in #1), distributing evenly. It will come just below the top of each cup of the tin, which will give you a nice rounded muffin top.
  6. Baked at 425 for 5 minutes, then reduce oven temperature to 350 degrees without removing the muffin pan. Bake for an additional 20-25 minutes, depending upon your oven, or until a toothpick or thin knife blade comes out clean. 
  7. Remove from oven, wait a few minutes and then transfer muffins to wire rack to cool. If using butter/flour, you may want to gently brush off some of the coating from the bottoms before serving.
NOTE: Not all ovens are created equal and some run hotter than others. You learn that by experimenting. Our gas range runs about 10 degrees hotter than our electric oven did, so test the muffins a bit earlier to ensure they don't overbake. Lowering the temperature after 5 minutes (as instructed) gives the tops a nice crusty rounded finish that is the benchmark of a good muffin. Make sure to allow a good amount of time to preheat the oven to begin with so you ensure that it has reached the correct temperature.


Monday, August 31, 2020

Lemon Creme Pie with Toasted Coconut Topping


Lemon Creme Pie with Toasted Coconut Topping

(alas my photo disappeared and now I have to find it again! Disaster!)

Sometimes life leaves us with a lot of time on our hands to make lovely dishes and take great effort with prep. Other times you simply don't have the gumption, so you use what you have on hand to prepare something pretty tasty that is quick-as-a-wink, as my dad used to say.

This is one such recipe. Just a few basic things that are still easy to find on the shelves of the store or that you may well have in your cupboard right now. I find pre-made graham wafer pie crusts in aluminium foil pans to be one of the most marvelous inventions! They have saved me a lot of scrambling for ingredients when I had precious few during this whole pandemic. 

Just one hint: These crusts taste even better when you mix an egg white with a bit of water and brush it on the crusts before baking at 350 degrees for 10 minutes. It sets the crust and makes it a pretty brown.I also discovered the homemade toasted coconut is a breeze and intend to use it more often. SO here you go, friends! One of the latest creations by The Little Cook - me! 

Please note, this is homespun and not a fancy dessert. Easy, peasy lemon squeezy, to coin a phrase.


LEMON CREME PIE WITH TOASTED COCONUT TOPPING

INGREDIENTS

Pie Crust

I am not fussy but Keebler seems to have a tastier finish when prepared. I have used many generic graham pie crusts that are excellent as well but they do tend to crumble a bit more quickly. It also bakes to a nice golden color (see directions above). Home made is always the best.

Filling

  • One can of lemon cream filling OR lemon pie filling or you can prepare your own from package directions
  • One 8-oz tub of Cool Whip or a similar topping
Toasted Coconut Topping
  • Approximately 4 oz of flaked coconut. 


PREPARATION

  1. Preheat oven to 350 degrees. Whisk 1 egg white with a bit of water in a small bowl, then brush lightly onto the top of the pie crust. Heat in oven for approximately 8-10 minutes before removing. Set aside to cool. Leave oven on for the coconut layer.
  2. While the crust is in the oven, fold together the lemon filling and cool whip in a medium bowl until thoroughly blended. Cover with plastic wrap and place in fridge til ready to use.
  3. To toast coconut: Place on a cookie sheet or foil pan large enough to spread the coconut into one even layer. This insures even toasting. Place onto middle rack of oven and heat, stirring ever couple of minutes and shaking gently to distribute pieces, until an even golden color is reached. It is okay to have some lighter and darker bits. Let cool for approximately 15 minutes.
  4. Once the crust has cooled, empty the bowl of filling onto the crust, spreading it evenly with a spatula or wide knife. It will be quite thick.
  5. Sprinkle evenly with the coconut. The variety of colors is what makes it so attractive. Place in fridge, covered with the lid that comes with the crust (another reason I love the convenience) or plastic wrap to cool for a couple of hours before serving.
 Et voila! A yummy summer dessert.

Note: Flaked coconut gives a slightly more tasty, chewy texture that complements the creaminess of the filling.

Enjoy!

Sunday, March 29, 2020

Taco (shepherd's pie) Meatloaf

Here is a recipe that is adaptable as to ingredients and prepares easily in an RV with minimal clean-up or sink/counter room necessary. Please note - the light in here wasn't great so they look twice as dark as they really are. Ooops. 

Taco (shepherd's pie) Meatloaf


Ingredients

* About 1.3 to 1.5 lbs of lean ground beef
* 1 pkg of taco seasoning (I used McCormick)

* 2 large eggs
* 1/2 lb grated sharp cheddar cheese
* 1 small bunch of green onions (finely chopped)
* 1 pepper (red or green) cored and finely chopped
* 2 Roma (or other small) tomatoes, chopped
* about 1 tbsp butter

Prep


1. Place butter, onion and pepper in microwave safe bowl and let heat in microwave for about 10 min. on high to saute
2. Remove bowl from microwave and add the rest of the ingredients, mixing thoroughly with your hands.
3. Grease 1 large or 2 med loaf pans (I used foil for easier clean-up afterward). Divide mixture in pans (or put in large pan) pressing down gently.

Bake in preheated oven at 350 for 30 min, pour out excess liquid carefully (not quite set yet) then raise heat to 375 for an extra 15 min or so. I have a convection/ countertop oven so always bake/cook things 15 degrees lower than directed. I large meatloaf would probably be 375 degrees for a hour or so.

Note: I was going to top with mashed potatoes sprinkled with cheese (hence the Shepherd's Pie title) for the last 10-15 min (after draining) to make a taco shepherd's pie but since I didn't get potatoes in my food order we will have rice on the side. Also sorry about that dang dark photo! Best I could do for now :)

Tuesday, August 7, 2018

Oven-Roasted Vegetable Medley


This is one of our absolute favorite dinner sides - in fact, we have been known to make a whole meal out of it. The best part about it is you can use almost any vegetables, especially root veggies since they seem to work best. I will give you the ingredients as I used them last time. Sooooo tasty!

Oven Roasted Vegetables:
Preheat oven to 400 degrees. Line a 9x13 inch pan with heavy duty foil.
              

Ingredients

  • small red potatoes, cut into 4 pieces each (scrubbed, skin-on)
  • baby carrots or washed and scrubbed regular carrots chopped into large chunks
  • green peppers - wash, remove seeds and chop into chunks
  • zucchini - wash and cut into chunks or thick slices
  • onions - either whole baby onions or any other type peeled and cut into chunks.
  • Garlic cloves if desired **I stopped here but you can also add turnips or rutabaga or parsnips (if you like them) **
  • olive or canola oil
  • Italian seasoning, rosemary, smoked paprika, salt and pepper
Preparation
  1. As you chop your veggies, place in a large bowl. Drizzle with about 1/4 c or so of oil along with your favorite seasonings. Toss gently to thoroughly coat
  2. Dump carefully into a foil-lined pan and spread out evenly for consistent roasting.
  3. Place on the middle rack of the pre-heated oven and roast for approximately 40-45 minutes, until vegetables are tender and turning golden brown.
Excellent when served with roasted turkey or chicken or with BBQ or grilled meat. This made enough for a few meals for us. Bonus!!


Monday, December 19, 2016

Twice-Baked Potato Casserole

This recipe is an adaptation from a recipe at allrecipes.com, one of my favorite go-to sites. It is perfect for potlucks, family dinners and with a bit of tweaking (see below), is just right for large gatherings (2 pans). This is the perfect dish to prepare the night before and bake the following day. And yes, I had to taste it for "quality control" <koff koff>.


Ingredients

  • 2 large baking potatoes (or 6 regular)
  • 1/2 pound lean bacon (or Real Bacon Bits)
  • 3/4 cup shredded sharp Cheddar cheese
  • 1/2 cup sour cream
  • 1/4 cup milk
  • 2 tablespoons butter, melted


  • 1 teaspoon dried chives
  • 1/2 teaspoon salt
  • 1/2 teaspoon ground black pepper
  • 1/2 teaspoon garlic powder (optional)
  • 3/4 cup shredded mild Cheddar cheese

Directions


  1. Preheat oven to 400 degrees F (200 degrees C). Grease a 9x13-inch casserole dish.
  2. Poke a few holes into each potato using a toothpick.
  3. Bake potatoes in the preheated oven until fully cooked, about 1 hour. Cool for about 15 minutes.
  4. Place the bacon in a large skillet and cook over medium-high heat, turning occasionally, until evenly browned, about 10 minutes. Drain the bacon slices on paper towels and crumble.
  5. Cut a thin slice from one side of each potato; carefully scoop out the flesh and transfer to a bowl. Discard skins. Mix 3/4 cup Cheddar cheese, sour cream, milk, butter, chives, salt, black pepper, and garlic powder with potatoes. Spread potato mixture into the prepared casserole dish; top with 3/4 cup Cheddar cheese and crumbled bacon.
  6. Bake in the preheated oven until just bubbling, 10 to 15 minutes. Cool for at least 5 minutes before serving.

*Let the 'tweaking' begin. I baked 5 lbs of potatoes and, after letting them cool slightly, I scraped the contents into a big bowl and chopped them up with my spoon. I added a full bag (8 oz) of sharp cheddar, 1 1/2 c of sour cream, 2 tbsp of dried chives, half bag of Kroger 'real bacon bits', ground pepper and salt (didn't measure, just poured some on my hand and then into the bowl). I didn't use garlic salt because the chives provided sufficient seasoning). I used about a cup of milk and about 4 tbsp of butter. The potatoes were still hot enough to melt the butter when mixed in. I folded everything together, put it in one larger foil lasagna pan and one smaller, more shallow aluminum foil cake pan (about 8.5" by 12.5") for us. I used another half bag of shredded sharp cheddar to top the two pans and sprinkled liberally with dried chives and about half the pack of bacon bits. The casserole was moist, not wet, before baking and because I like my casseroles well cooked, the small one took about 25 minutes to warm through with bubbly cheese. I will probably cook the large one for about 30-40 minutes. Turned out tasty, slightly puffy and smelled delicious!*

Monday, September 26, 2016

The Little Cook's Enchilada Casserole

We went bulk grocery shopping, taking advantage of the case lot sales about a month ago, and the rest is history! This casserole may feature tortilla chips on top rather than actual rolled tortillas in the mix, but it's tasty, easy and above all, quick for those evenings when you just don't have time to fix. Plus it offers quite a bit of left-overs - always a bonus in our house.

Little Cook's Enchilada Casserole


  • 1/2 lb ground turkey (browned in a couple of tsp of canola or olive oil)
  • 2 c cooked rice, white or brown - a great way to use left-over rice!
  • 1 chopped onion
  • 1 14 oz can of corn (not creamed)
  • 1 14 oz of kidney or black beans 
  • 1/2 jar of your favorite chunky pasta sauce
  • 1 pkg of taco or chili seasoning
  • 1/2 to 2/3 pkg sharp cheddar cheese (approximate 1- 1 1/2 cup)
  • about 1 c of any flavor of broken tortilla chips (I used some awesome sweet chili chips)
  1. Mix together ingredients, from the browned turkey to the taco seasoning. If you like, you can stir half the cheese into the mix. Place in large casserole.
  2. Sprinkle with tortilla chips and the remainder of the cheese
  3. Bake at 350 degrees for approximately half an hour, until the cheese is melted and bubbly.
Note: It tastes even better the next day and the day after that, as the flavors mellow and blend!

Sunday, April 10, 2016

Mom's Favorite Unbaked Cheesecake

Whenever we had a special occasion at home such as my birthday or Christmas, Mom would make this unbaked cheesecake and it was everyone's favorite. Yesterday, after 2 decades of missing the taste, I finally got up the courage and ingredients and attempted it myself. There must be something about nostalgia, because nothing ever tasted better than the memories brought back with that first bite. Pure Nirvana. So here, in all its glory, straight from The Mennonite Cookbook, is my Mom's best unbaked cheesecake to delight your own taste buds and family.

Mom's Favorite Unbaked Cheesecake
And yes, we already dug into it, Pure deliciousness!


Ingredients

  • 1 pkg lemon jello
  • 1/2 c boiling water
  • 1 8-oz pkg cream cheese
  • 1/2 c white sugar
  • 1/2 pint (8 oz or 1 c) whipping cream
  • 1/2 box graham wafers
  • 1/4 c butter or margarine, melted
  • 10 maraschino cherries, cut
  • 1/2 c drained crushed pineapple
Preparation
  1. Dissolve Jello in boiling water and let stand while preparing the other ingredients.
  2. Beat whipping cream until stiff in a medium bowl.
  3. With the same beaters, beat well together the cream cheese and sugar in a small bowl.
  4. Place graham wafers in a resealable bag and roll with rolling pin til finely crushed. Mix with butter/margarine and press 3/4 of the mixture into a 9x9 pan, reserving the rest for sprinkling on top.
  5. With mixing spoon, fold cream cheese mixture and Jello into whipping cream (that bowl will be big enough). Mix thoroughly, then fold in pineapple and cherries. 
  6. Pour over prepared base in pan and sprinkle remaining crumbs over top. 
  7. Place in fridge for at least 1-2 hours to set and ENJOY! This keeps well for a few days.

Monday, February 8, 2016

Super Duper Homemade Calzones

So  yesterday was the Superbowl and my hubby had a hankering for calzones. Not any old calzones but the ones  he remembered from his days working at a pizza joint back in New York. He gave me his basic specs and found a recipe he thought would be ideal and then we went ingredient shopping. No sir, these were definitely not your garden variety calzones! I made a double recipe of dough as shown in the recipe and went to town preparing them. They ended up being HUGE! Like he said, now "thatza a calzone!" In retrospect I would prefer a commercial or good homemade pizza dough, since there is a lot of bread in each serving, but it sure was good! He ate one, I ate half and we have 2 in the freezer for another time plus the other half of mine for his dinner tonight. Serve with warm marina sauce drizzled on top, or in a small bowl for dipping.
Calzones

<adapted from this recipe>

Ingredients (for 2 huge calzones)


  • *1 (.25 ounce) package active dry  yeast
  • *1 cup warm water
  • *1 tablespoon olive oil
  • *1 teaspoon white sugar
  • *1 teaspoon salt
  • *2 1/2 cups all-purpose flour,            divided
  • *1 teaspoon olive oil
  • *1/2 cup ricotta cheese
  • *1 1/2 cups shredded Mozzarella 
  • *Parmesan cheese
  • *1/2 c Canadian bacon
  • *1/2 cup diced pepperoni
  • *1/2 cup chopped bell pepper
  • *1 tbsp basil or Italian seasoning 
  • *1 egg, beaten with 1 tbsp water and 1 tsp olive oil (for the "wash")

    Directions

    1. Dough: THE RECIPE MAY BE DOUBLED TO MAKE 4 HUGE CALZONES. 
    2. In a small bowl, dissolve yeast in water. When soft pour into medium bowl (use large bowl if doubling recipe) and add the oil, sugar and salt. Mix in 1 cup of the flour until smooth. Gradually stir in the rest of the flour, until dough is smooth and workable. Knead dough on a lightly floured surface for about 5 minutes, or until it is elastic. Place dough in a bowl containing 1 teaspoon olive oil, then flip the dough, cover and let rise for 40 minutes, or until almost doubled.

    1. Filling: DOUBLE IF MAKING A DOUBLE RECIPE OF DOUGH
    2. 1. Preheat oven to 375 degrees F (190 degrees C).
    3. 2. While dough is rising, combine the pepperoni, Canadian bacon, chopped peppers and basil leaves or Italian seasoning in a small bowl. Toss well, cover bowl and refrigerate to chill.
    4. 3. When dough is ready, punch it down and separate it into 2 equal balls (4 balls if you have doubled the recipe). 
    5. 4. Roll each out into a THIN circle on a lightly floured surface, one at a time. 
    6. 5. A so-called authentic calzone recipe said to do it this way, so I did: Fill each of the two circles with half the mozzarella on the lower half of the circle topped with filling (refrigerated pepperoni, Canadian bacon, pepper and spices), then scooped ricotta cheese, salt and pepper and Parmesan cheese sprinkled on top. Fold the top over the fillings and secure edges by rolling/folding up,  pinching and pressing with a fork. Brush the top of each calzone with beaten egg mixed with oil and a bit of water and place on a lightly greased cookie sheet (I used a perforated pizza pan for 2 of the ones I made from the double recipe placed on the middle rack and a cookie sheet topped with silicone sheets on the second-from-lowest oven rack). REPEAT WITH REMAINING DOUGH (BALL). As you can see, these are humongous. 
    1. 6.Bake at 375 degrees F (190 degrees C) for 30 minutes (as above) until cooked through and a beautiful golden brown. Serve hot with marinara or a favorite spaghetti sauce heated for dipping or drizzling.

    Please note: I saved some money by using a bag of Italian Mixed Shredded Cheese containing Parm, Mozza, Asagio and Romano. That saved me time, too, by letting  me spread this on the bottom of each circle without having the expense of Parm to sprinkle on top and gave a little extra flavor. I found the  mix of egg/water/olive oil gave it a beautiful sheen and color.

    Monday, February 1, 2016

    Game Day Recipes: Cheesy Pull-Apart Sliders

    This recipe was featured on our local Fox 8 News channel page and I received it in my email. It looks so good that I had to share it with you! Definitely a must-do for the big game! Put these on a table with some chili, pulled pork or chicken wings, veggies and dip plus other munchies and you have everything you need for an ooey gooey (calorie-laden but who watches calories anyway on Superbowl?) good time!

    Cheesy Pull-Apart Sliders


    Sliders:
    • 1 pound lean ground beef
    • 1 teaspoon salt
    • 1 teaspoon pepper
    • 1 teaspoon mustard powder
    • ½ teaspoon smoked paprika
    • 2 cups diced onion (about 1 medium onion)
    • 3 cloves garlic, minced
    • 1 (10-oz) can Ro-Tel Diced Tomatoes and Green Chiles, drained
    • 12 slices cheddar cheese
    • 12 dinner rolls

    Glaze
    • ½ cup (one stick) butter
    • 2 tablespoons Brown Sugar
    • 1 tablespoon Worcestershire sauce
    • 1 tablespoon mustard
    • 1 tablespoon sesame seeds
    Instructions
    1. Preheat oven to 350 degrees F.
    2. Place a large skillet on the stove top over high heat. When the pan is hot, add the beef and season with salt, pepper, mustard powder, and paprika. Add the onion and garlic, and cook, stirring occasionally, until beef is browned and onions are golden. Stir in drained tomatoes until combined.
    3. Slice dinner rolls in half and place bottom half of rolls in 9x13 baking dish. Top with beef mixture & sliced cheese. Finish off with the top half of the bun.
    4. Mix all the ingredients for the glaze in a sauce pan over medium heat (or microwave about 40 seconds) and mix until melted, smooth, and combined. Pour evenly over the buns.
    5. Bake at 350 degrees F for 25 minutes.
    Makes: 12 burgers.

    Tuesday, September 22, 2015

    Creamy Chicken and Wild Rice Soup

    Creamy Chicken & Wild Rice Soup Before the Addition of the Cream Sauce
    I got this recipe online and it's a real keeper. I made a few adjustments, but I still owe the owner a debt of thanks for a great cream soup recipe! I did use low fat milk because I added a can of Cream of Chicken soup to the boullion and water in the recipe. There are quite a few spices and the addition of the white sauce as she posted it adds to temper the flavor. All in all, a good soup! Even better when paired with a loaf of fresh bread. I used a loaf of Rhodes dough that I thawed and shaped into an angel food cake pan for this one. Yum!

    CREAMY CHICKEN WILD RICE SOUP (for the slow cooker)
    Idea from Author: 

    • 1 c uncooked wild rice blend (I used a box of Uncle Ben's and added it an hour before the soup was done)
    • 1 pound boneless, skinless chicken breast
    • 1 onion, chopped
    • 3 stalks celery, chopped
    • 4 large carrots, chopped
    • 3-4 cloves garlic, minced
    • 1 tbsp seasoned salt
    • 2 bay leaves
    • 1 can low sodium chicken broth
    • 1 can cream of chicken soup (low fat or regular)
    • 4 cups water
    • 1-2 tablespoons salt-free poultry seasoning
    • 5 tbsp butter
    • ½ cup all purpose flour
    • 1 1/2 - 2 cups low-fat milk 
    • salt and pepper to taste
    INSTRUCTIONS
    1. *Rinse wild rice under running water*. Place the uncooked rice, chicken breast, onions, celery, carrots, garlic, bay leaves, chicken broth, water, seasoned salt and poultry seasoning in a slow cooker. Cover and cook on the high setting for 3-4 hours or on the low setting for 7-8. In the last ½ hour of cooking, remove the chicken from the slow cooker. Allow to cool slightly before shredding using two forks.
    2. When the rice is done cooking, add the shredded chicken back into the slow cooker. Melt the butter and oil in a saucepan. Add the flour and let the mixture cook for about 1 minute. Whisk the mixture slowly while adding in the milk. Continue to whisk until all lumps have dissolved. Allow the mixture to thicken and become creamy (this is how you make a basic cream sauce).
    3. Add this creamy mixture to the slow cooker. Stir to combine. I didn't add any additional  liquid because it was just right - nice and thick. Let it simmer in the slow cooker for 1/2 hour to 1 hour, until thick and creamy and well-blended.

    *Do NOT use quick cook rice because it will get all mushy. If you use an uncooked package of rice such as Uncle Bens Wild Rice add it for the last hour, just before you put the cream sauce in.
    **To reheat, add a bit more milk or water because it will be very thick once it stands in the fridge. Make sure to refrigerate as soon as it's cool enough to avoid spoiling.

    Great served with fresh bread

    Tuesday, November 4, 2014

    Whole Wheat Oatmeal Bread & Crockpot Dinner Rolls

    Much to my surprise, old dogs CAN learn new tricks since I found a cool article on things you never knew you could make in a crock-pot! Surprise - dinner rolls are one of these things. I seem to be on a roll (no pun intended) on using recipes to make more than one item. Pies and crumbles, etc and now bread and rolls. There is nothing wrong with this! First note is I used a traditional crock pot and NOT a slow-cooker for this recipe. I love my slow-cooker and use it at least weekly, but it's not appropriate for recipes that call for a crock-pot, something I discovered years ago. I also used a bit of this and a bit of that, since that was what I had in the house, so when I say "approximately," please forgive me! There are times that I am a 'pinch of this and a  dash of that' kind of gal. Here we go. Get ready to say"yum!" Armed with active rising yeast, whole wheat flour (and a bit of left-over white flour), traditional oatmeal and other ingredients, I set upon a voyage of discovery...


    Whole Wheat & Oatmeal Bread (plus Crock Pot Dinner Rolls)

    Ingredients

    • 1 pkg active dry yeast
    • 2 cups of warm (not hot) water - divide into 2 portions of 1c each
    • 1 - 2 tsp white sugar
    • 3 tbsp margarine or butter, softened but not melted
    • pinch of salt
    • 3/4 c golden brown sugar (yep, that's right) or 1/2 c  honey or molasses
    • 1 c rolled oats
    • 1 c white flour
    • 3-4 c whole wheat flour (more for kneading)

    Preparation

    1. Prepare warm water. Place 1 cup warm water mixed with white sugar in a small bowl or 2c measuring cup. Sprinkle package of yeast over the water and place in a warm spot to rise (10 to 15 min.)
    2. While yeast rises, place brown sugar and salt in a large bowl. 
    3. Soften margarine or butter in microwave until soft, not melted (30 seconds or less)
    4. Stir yeast/water  and stir into brown sugar, adding additional cup of warm water and stirring well. Make sure you get all the yeast out of the mixing cup.
    5. Add one cup of white flour and 1 c rolled oats and stir.
    6. Stir in approximate 2 to 3 c of whole wheat flour. 
    7. Once you can't stir in more flour, remove mixture to a floured surface to knead for about 10 minutes, until smooth and not sticky. Add additional flour as needed to make a MEDIUM stiff dough. The secret is to keep kneading until all the flour is mixed in and the dough is smooth. Kneading adds air to the dough, producing a delicious, lighter bread.
    8. Butter the bowl you used for the dough, place the dough in the bowl, cover with a towel and rise in a warm spot for 1 to 1 1/2 hours - until the dough has doubled in size. You may want to put a bit of butter or margarine on top of the dough as it rises. It makes a tastier finished product.
    9. Once dough  has risen, punch down and dump onto a floured surface. Cover and rest for about 10 minutes.
    10. Take about 1/3 of the dough (or a bit more) and divide into 8 pieces (about the size of an egg) for rolls. Roll each bit  between your hands (rest the piece of dough on the palm of one hand and cup and roll your upper hand to form a smooth roll - I learned this when I was a baker's assistant :)
    11. Place in an unheated buttered crock pot and let rise for an hour or so).
    12. Take the remainder of the dough, shape into a smooth oblong roll and place in buttered loaf pan. This should also rise for about an hour until doubled in size. Preheat oven to 375 degrees.
    13. Turn the crock pot to high and bake the dinner rolls for approximately 60 minutes or so. Check to make sure they are soft and no longer sticky. They should have some 'give' but not be too soft. Mine were done in about 55 minutes, but my crock pot is fast. The original recipe said 60-90 minutes.
    14. While the rolls are baking place the bread in the preheated oven. Bake for about an hour or so, until the bread is a deep golden brown and the top can be tapped (not a hard bread, but solid).
    Let the scent of all this deliciousness permeate throughout your home as the dough rises and then bakes. You will have the butter (and/or homemade jam) ready by the time you take the bread and buns out of their respective pan (and crock pot), but let them cool slightly so you don't burn your mouth! Let the bread sit in the loaf pan and run a knife carefully around the edges to loosen. This is why we butter the pan well. The dinner rolls should simply lift out from the crock pot with no issues - I used a fork and it worked well. Nice and golden, soft and almost steamed perfection. I will make this recipe again! Please note: Whole wheat bread is not as fine in texture as white bread, but boy does that flavor ever make up for it!                                                                    


    Monday, September 1, 2014

    Fruit & Mixed Berry Pies and Crumbles

    Once in a while, as those who know me may know, I go bulk when I am baking. No, that doesn't mean gaining weight (though that is a distinct possibility when there is baking in the house)! It means making a filling and using it in different ways, a little baker's secret I learned during the lean(er) years. This time it meant making up a delicious fruit medley with apples, pears and peaches and creating pies and "crumbles" a.k.a. apple crisps or brown betty. The berries came into play because I had a craving for another fruit crisp with a different flavor. So here you go, two-in-one recipe ideas. Note: I got a big bag of Envy and Cripp's Pink apples from Sam's Club so I used them in the pie mixture, but you can just as easily use Pink Lady, Fuji, Delicious, Mac, Gala or any other apple.

    FRUIT PIES


    Ingredients

    • 6 apples - I like mixing varieties - washed, cored, peeled and sliced into chunks
    • 2 peaches - washed, peeled and sliced into chunks
    • 2 Bartlett pears (love this variety) - washed, peeled and cut into chunks
    • 1/2 c golden brown sugar, 1/2 c white granulated sugar
    • 2 tbsp ground cinnamon (we do love our cinnamon)
    • 1/2 c water (enough to just cover the bottom of a medium to large sauce pan
    • 1/4-1/2 c cornstarch mixed with approx. 1 c water
    • Butter or margarine
    • 1c. white sugar mixed with 1 tbsp cinnamon
    • 4 prepared pie shells (I cheated and used commercial frozen shells)
    Preparation
    1. Cut fruit (as above) and place in sauce pan with water (as directed above). Simmer until soft (approximately 10-15 minutes), adding a bit more water to keep from scorching, then add sugars and cinnamon, stirring to combine. Simmer for an additional 10 minutes or so, stirring often until fruit releases its juice. Stir in cornstarch and water until mixture thickens to a pie filling consistency. Remove from heat.
    2. Roll out pie shells and place in pie plates. This mixture will make enough for 2 pies plus a crumble (recipe to follow). Place about 2 big ladles-full of mixture in each pie shell and dot with butter or margarine. Cover with top pie shell and crimp edges, then score with a fork to let steam escape. 
    3. If you use aluminium pie plates, like I did, place on a large cookie sheet (with sides). 
    4. Sprinkle each with about 2 tbsp cinnamon/sugar on top and bake in 425 degree oven for 10 minutes, then reduce heat to 375 and bake for an additional 30-40 minutes, until the fruit is simmering on the edges and the pie crust is golden brown.
    5. Cool slightly before serving with whipped cream or ice cream.
    If you want to freeze the pies, like I did, let them cool thoroughly and then mix in foil and place each in a freezer (Ziploc) bag until you want to serve them. Then just unwrap and place on a cookie sheet, heating at 350 degrees until heated through. They will be like fresh once more.

    FRUIT CRUMBLES


    While the fruit pies are baking, ladle the remaining pie mixture into a pie plate. I found I had 2 extra pans left when I used the frozen pie shells, which was perfect for these 2 crumbles. Mix the rest of the cinnamon/sugar mixture (previous recipe) with about 2 c flour, 1/2 c brown sugar and 1/2 c butter or margarine. Mix into crumbs using a pastry blender or chop with 2 knives until crumbly (hence the name). Pour about 2 to 3 c of frozen mixed berries (I used a strawberry/blueberry mixture) into the other pie plate and then simply pour on and pat half the crumbs or crumbles on top of each. Place on a large cookie sheet. Once the other pies are finished, place these 2 'pies' on the cookie sheet and put in the heated oven (raise temperature to 400 degrees). The apple mixture crumble will take about 30 minutes to heat through and combine, baking until the crust is golden (as above) and the mixture is oozing out. The berry crumble (bottom) takes about an additional 10 minutes because the berries were put in frozen. If you use fresh mixed berries in season, they will take the same amount of time as the apple crumble. Don't under-cook, because the crumble will taste raw, but over-cooking will burn the crispy topping. Watch closely after 20 minutes.

    This may be eaten right away with ice cream or whipped cream, or it may be wrapped in foil and Ziploc bags and frozen until you want a home-made treat without all the effort. Enjoy! If you want to freeze and reheat, follow directions in previous recipe.

    Note: The cooked apple mixture also is delicious when placed on Pillsbury Crescents, rolled and baked as directed to make "Wormy Apple Crescents" with children. Just stick a couple of gummy worms in each crescent after they are baked. Kids love it! Imagine, 3 ways to use one recipe!

    Twisted Inside-Out Stuffed Peppers

    I seem to be on an inside-out quest these days, with inside-out cabbage rolls and now this delicious inside-out stuffed pepper dish. Since I only had 2 good-sized peppers - a yellow and an orange pepper -  on  hand but wanted to make an economical, diet-friendly dish that would last several meals, this just seemed to make sense. The flavors of the ingredients were simmered to delectable perfection and the dish turned out delicious. I do love 'one pan dinners!' So here is my secret to the "perfect," easier to prepare 

    [Yes, these are the left-overs since we devoured dinner before I could take photos - oops]


    Twisted Inside-Out Stuffed Peppers.


     Ingredients

    • One lb lean ground beef - 80% lean or so
    • 3/4 sweet onion, coarsely chopped
    • 1 yellow and one orange bell pepper (or green or red), coarsely chopped
    • Combined 2 tsp Italian seasoning, 1 tsp garlic salt, pinch of pepper and dash of salt
    • 1 24-oz jar of your favorite spaghetti or marinara sauce
    • 1/4 c. water
    • 3 c. cooked white or brown rice 
    • 1 c combo of sharp cheddar and mozzarella cheese (or whatever you have at home)
    Preparation
    1. Cook rice as directed on package. Remove from heat and cover.
    2. Place 1 tbsp oil into large skillet or saucepan. Add ground beef, onion and seasoning. Cook over med-high heat, stirring often, until ground beef is brown - about 10 minutes. Add peppers to the mixture and stir for another 10 minutes or so, until the beef is crumbly and onions are translucent. With lean beef you shouldn't have to drain off any fat.
    3. Pour jar of sauce over the top, place water in jar and swirl, pouring into pan to use up the last of the sauce in the jar. Stir, then reduce heat to let mixture simmer after  it reaches a gentle boil. Simmer, stirring often, for approximately 10 minutes to blend flavors and heat sauce.
    4. Add rice and stir thoroughly, simmering for an additional 5 minutes until thoroughly heated and all ingredients are combined.
    5. Grate cheese and sprinkle on top while the mixture is simmering, then turn off heat. The cheese will melt into gooey deliciousness on top.
    6. Let sit five minutes, then serve in bowls or plates with sides. Refrigerate left-overs as soon as slightly cooled.
    7. This will serve 6-8 hungry people and may be accompanied with a green salad, breadsticks or rolls if desired.


    This is what it looks like when hungry critters smell the concoction cooking :) I won't post a photo of what we looked like it eating it. It might be embarrassing.


    Wednesday, May 7, 2014

    Super Humongous Pizza


    We have a pizza pan that I absolutely love. It's about 16 inches in circumference and has holes, or perforations, in the bottom to allow for a evenly baked crust. Next to a pizza stone, it's my 'go-to' pizza necessity!

    So, we had a Pay Per View event to watch, which called for us to have pizza, of course. Being short of budget but high on imagination, I crafted this combo Turkey Pepperoni/Hawaiian Pizza and wow, was it filling. The maple bacon needed to be precooked to add to the flavor and take away some of the stringiness but it was worth the effort! I took some shortcuts but like every artistic endeavor, it still took quite a bit of preparation time. I could have made my own crust, but after all the chopping and fussing, I got lazy.

    Please note, I had forgotten to sprinkle on the black olives so I did that over the pepperoni side after the fact. No one ever said I was perfekt!

    World, meet

    "SUPER HUMONGOUS PIZZA."

    INGREDIENTS

    • 2 packages of pizza crust mix (the kind you just add warm water to) or store-bought crust
    • 1 bottle or can of pizza sauce (8 oz or so)
    • turkey pepperoni - 1/2 pkg
    • bell peppers - 1/2 red, 1/2 green, 1/2 orange or yellow, thinly sliced
    • tomatoes (I used cherry tomatoes cut in half)
    • sweet onion - 1/2 onion, thinly sliced
    • Canadian or maple bacon (cut in chunks and precooked for 3 min in paper towel in microwave)
    • 1/2  12-16 oz. can pineapple tidbits or chunks, drained. Cut chunks in half to use.
    • 1 pkg grated/shredded mozzarella cheese 
    • 1/2 pkg grated/shredded sharp cheddar cheese
    • 1 small can sliced black olives, drained
    • 1/2 c grated Parmesan cheese
    PREPARATION
    1. Cut up all ingredients as needed and prepare bacon. No need to precook Canadian bacon. Prepare pizza crust as directed on package (doubling the recipe if using the 2 pkgs). If you prefer, you can use a store-bought pizza crust or your own favorite recipe.
    2. Grease a LARGE (16") pizza pan or two smaller pans. If using a smaller pan, use one package of pizza crust mix, the pepperoni, half the pizza sauce, half the peppers and half the onions and cheese to make a Pepperoni Pizza. Do the same with the remainder of the ingredients for the Hawaiian Pizza. If using the large pan, make this a half-and-half pizza. 
    3. For a half-and-half pizza, spread the crust in the greased pan. Spread the sauce over the prepared dough. Arrange pepperoni over half the pan and bacon over the other half.  Sprinkle the tomatoes over the pepperoni. Sprinkle the pineapple over the bacon. Cover the entire pizza with the cut-up peppers, onions and black olives. Spread shredded or grated cheese over the entire pizza to cover. Sprinkle Parmesan cheese over the top. 
    4. Bake in 450 degree oven for approximately 25 to 30 minutes, until cheese is golden on the edges and completely melted. Let rest for 5 minutes, then cut into generous slices using a pizza cutter. 
    5. Manga.


    Monday, January 27, 2014

    Southwestern Chicken Chili for the Slow Cooker

    Here's a tasty, stick-to-your-ribs slow cooker meal that's even on the Weight Watchers recipe list [found that out after the fact]! It's 9 points, which is reasonable for a dinner. This is definitely a new family favorite! 

    And yep, I have started Weight Watchers and can't wait to share my journey with all of you. 2 weeks so far, 3 pounds lost! And so it begins...


    Southwest Chicken Chili
    • 1½ lbs chicken breast
    • 3 cans petite diced tomatoes (14.5 oz each) - plain or seasoned
    • 2 cups medium salsa (I used home-made)
    • 1 (14.5 oz) can corn, undrained
    • 2 (14.5 oz) cans black beans, drained and rinsed
    • 1/2 sweet onion, coarsely chopped
    • 1 pkg ranch seasoning
    • 1 pkg taco seasoning
    • Toppings – grated cheddar cheese, low-fat sour cream, tortilla strips,corn chips, etc.
    Instructions
    1. Combine all of the ingredients in a gallon-sized freezer bag. Zip close and place in freezer. 
    2. When ready to use thaw in fridge overnight. 
    3. Empty contents into crock-pot and cook on low 4-5 hours. 
    4. Remove chicken from crock pot and shred. Place chicken back in crock pot and stir. Serve with desired toppings.

    Kitchen Notes: I cut the chicken into large chunks before placing it in the bag. This helped it cook more evenly and was easier on the fingers that way (didn't have to remove it, hot, to cut up). Also, I used boneless, skinless chicken thighs which gave it even more flavor. If you don't have 2 cans of beans, one will do. Mine was made with 1 lb of chicken thighs, 2 cans of diced tomatoes (one regular, one with Italian seasoning), 1 can of beans.  The rest stayed the same. I had my serving with an ounce of grated cheddar and 2 tsp of low-fat sour cream, while Mike opted to just use the cheese.