Saturday, January 20, 2024

CHOCOLATE PEANUT BUTTER MARSHMALLOW SQUARES (aka CONFETTI SQUARES)

 CHOCOLATE PEANUT BUTTER MARSHMALLOW aka CONFETTI SQUARES

True confessions: I didn't take a photo of just my chocolate/marshmallow/peanut butter squares (aka "confetti") so I am sharing a photo of our Christmas Cookie "Tree" display. Lots of goodies on there - some recipes I have previously shared, some yet to come. But anyway, this is our variety, and if you look carefully, on the bottom part of the cookie stand, you can see (left to right), cherry coconut slice, spritz cookies and yes, lurking to the right my ultimate favorite, chocolate confetti. So easy, so much fun to make a SO delicious!


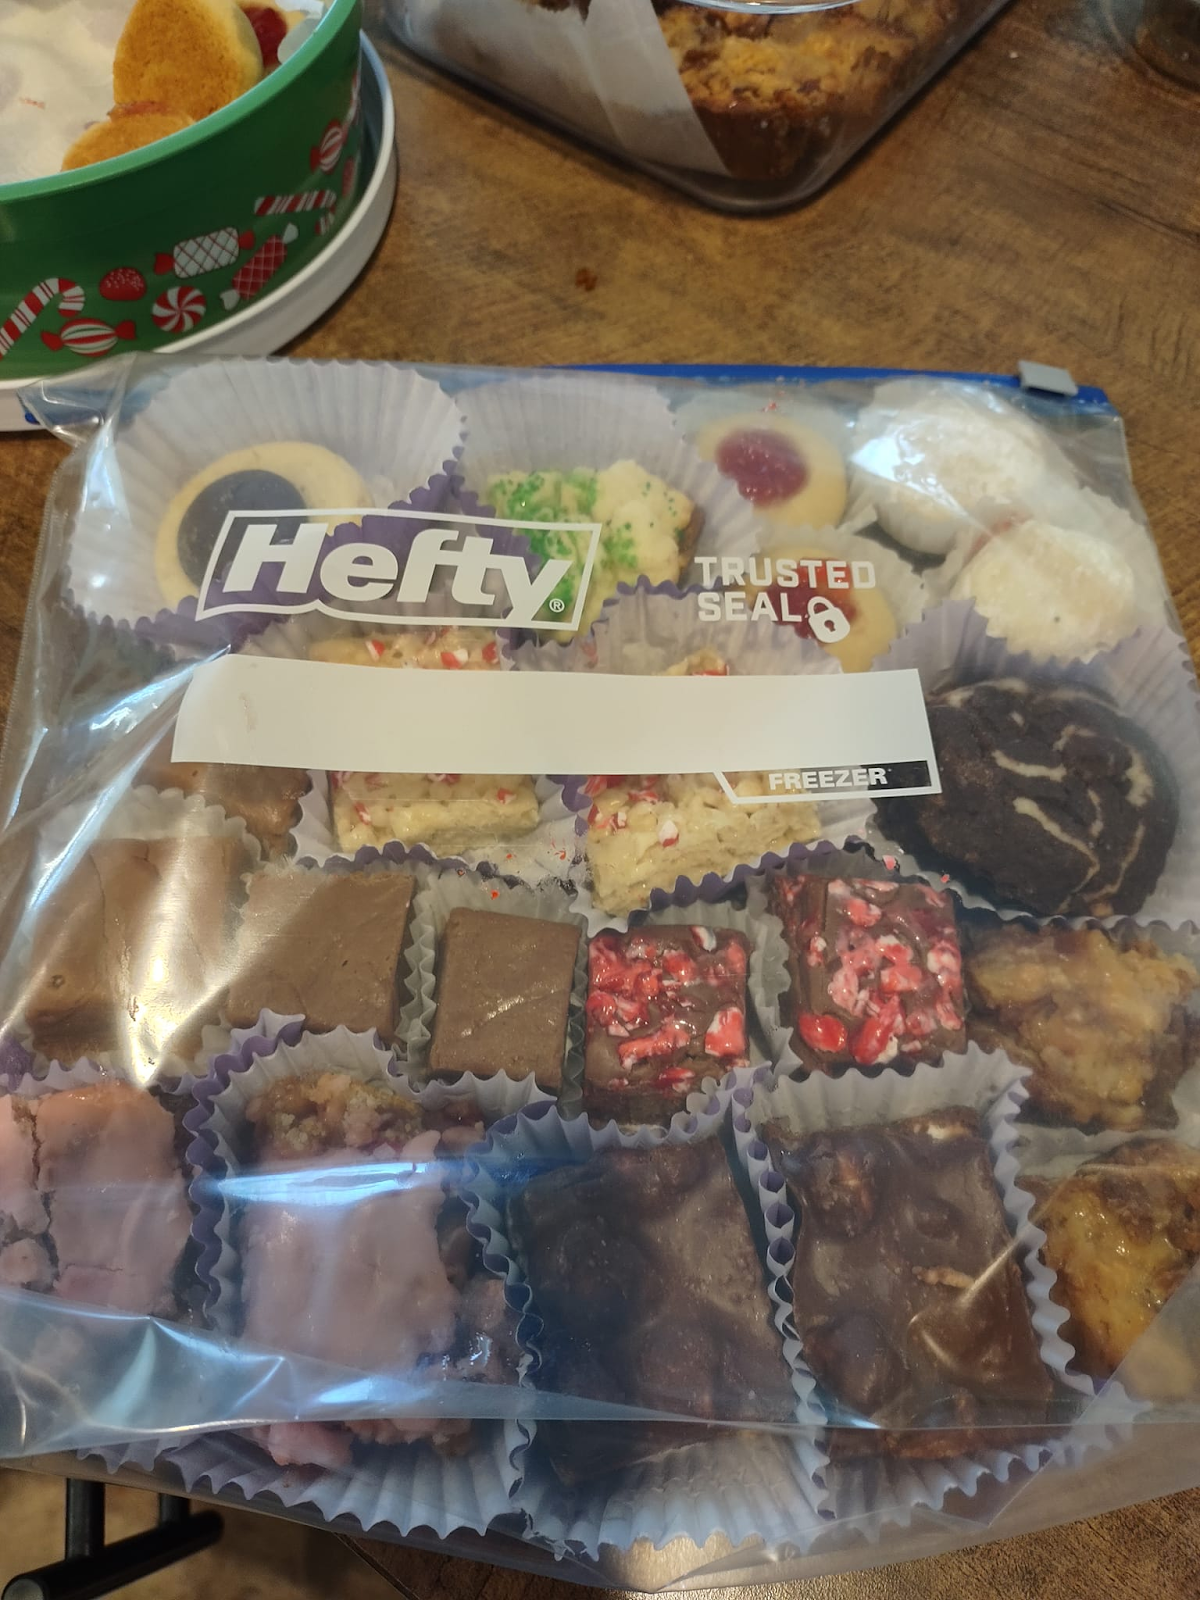
I decided to get smart and make stacking the dang thing a bit easier, so I packaged the variety of baking, tucked into cupcake liners, into freezer bags for easier filling. We do love our cookies! The Chocolate Marshmallow Squares have a prominent place on the bottom right of the bag since I like big chunks of this square - ok I admit it, it is an addiction! But the packed bag is so pretty that I had to share it, too. Just think, all the years I have done Christmas baking and have never thought of this little time and space-saver! Whoah!


So, what is the difference between "Chocolate Confetti" and Chocolate Peanut Butter Square? In my opinion, "Confetti" uses colored mini marshmallows while my square uses white marshmallows. Traditionally, Confetti uses milk chocolate chips while my square - this year - was a mix of half dark and half milk chocolate, which made all the difference. Whichever you prefer, all I know is that I have trouble stopping at one piece, hence only having 2 on the tray at once! Oh, and I prefer making it in a foil pan lined with foil so it's easier to remove and cut without issue. Just a little hint there. This year, I also added about half a cup of marshmallows to the pot while the mixture was still quite warm, so they added a bit of gooeyness, a chewier texture that we liked.


INGREDIENTS:

  • 1/4 c unsalted butter
  • 1/2 c cup creamy peanut butter
  • 3/4 c semi-sweet chocolate chips
  • 3/4 c dark chocolate chips (or use all milk or semi-sweet if you prefer)
  • 5 c white mini marshmallows (rainbow marshmallows for Confetti slice)
DIRECTIONS:
  1. Line an 8x8 or 9x9 foil pan (or baking pan) with aluminum foil. 
  2. In a medium saucepan, over low heat, combine butter, peanut butter and chocolate chips. Melt, stirring until smooth and completely combined.
  3. Remove from heat and stir in 1/c marshmallows - just for the square, not the Confetti.
  4. Let cool slightly and then mix in the remainder of the marshmallows.
  5. Spread in prepared pan and let set at room temperature. 
Note: The slice can be frozen at this point, but I find it much more attractive if sliced into squares with a sharp knife when set, then stored in the freezer in a freezer bag (as pictured above). Don't forget to save a few slices for the baker and a helper to sample! SOMEONE has to taste-test the goods!


Spritz Cookies (Cookie Press)

                                                          SPRITZ COOKIES


This cookie is one of my hubby's favorites, and since he could actually enjoy them this year, I made them as a special treat. I have always found them extremely fussy and guess what? I discovered that the difference is in the dough! Sheesh! Who would have guessed it! So here is a great "found" recipe with perhaps a tweak or two to make them even better.

Note: The recipe makes a LOT of dough - it pretty much filled the bowl of my stand mixer (my new toy). So, you can either go on "Cookie Palooza" and git going, using different sprinkles, cherries, tiny gumdrops or chocolate chips and so on for the center. The main thing is not to fret! Even if the cookies aren't perfect, they are the closest I have found to what I would deem a very light shortbread (my favorite) and a good, solid spritz dough. Enjoy, and if you prefer, you can freeze some of the dough for up to 3 months, wrapped in plastic wrap and place in a zipped plastic bag. The entire batch will take at least 3 cookie sheets, depending upon how large you "spritz your cookies." I do love my vintage cookie maker!


PUTTING ON THE SPRITZ


Ingredients:

  • 1 c unsalted butter, softened to room temperature
  • 3/4 c granulated sugar
  • 1 large egg, room temperature
  • 1 tsp pure vanilla extra (I used this for the first time and it makes a difference)
  • 1 tsp almond extract (we don't care for almonds, so I doubled the vanilla)
  • 1/2 to 1 tsp cinnamon
  • 2 1/3 c all-purpose flour, spooned and leveled
  • 1/2 tsp salt
The fun stuff: gel food coloring, sprinkles, chocolate chips, melted chocolates, halved maraschino cherries, etc. Let your imagination fly! If you want to use gel food coloring you only need a bit to color cookies before baking, since you want to keep them pastel. 

Instructions:
  1. Preheat oven to 350 degrees (177 C)
  2. Line 2 or 3 large baking sheets with silicone baking mats or use nonstick bakeware with no liner. (HINT: I have discovered that pressed cookies do not adhere to parchment paper BUT you can use aluminum foil with the dull side up as long as you watch that the bottoms don't brown too much. Do not use nonstick foil! This may mean slightly reducing baking time. If you can chill the prepared baking sheets, that works even better.)
  3. Making the dough: In the large bowl that comes with your stand mixer (or your own bowl using a handheld mixer) fitted with a paddle attachment, beat the butter and granulated sugar together on MEDIUM-HIGH for approximately 2 minutes. Add the egg, vanilla and almond extract (if desired). Beat on HIGH for about 1 minute. Scrape sides and the bowl bottom, beating again for an additional minute to combine. On LOW, beat in flour, cinnamon and salt. Turn to HIGH and beat until completely combined. It will start forming a ball. You can add gel food coloring at this point if you like.
  4. Pressing the dough: Fit the cookie press with your first decorative plate. It's fun to use variety, especially if you have children helping you. Hold the cookie press perpendicular to your pan (one edge touching and the press at an angle to help the dough stick), press out the cookies approximately 2 inches apart. Don't make too huge or press too hard or they may become distorted and won't be as pretty. If using sprinkles, brush the formed cookies lightly with water to help them stick before sprinkling and placing in the oven. If you find the dough is getting too soft, simply refrigerate between pressing, while the first cookie sheet is in the oven. 
  5. Baking: Bake for approximately 7-9 minutes. You want the bottoms just golden, not dark. Using foil as a liner on pans may take just 5 minutes per pan, depending upon your oven. I have a gas range that runs hotter, so I have to be really careful. Allow about 5 minutes before removing from pans to cool completely. I just put them on my counter on a clean tea towel, but some prefer using a rack. This is the time to drizzle on melted chocolate if you like.
Hints: 
  • Dough may be made beforehand and chilled in the fridge until you are ready to make your cookies. If you freeze the dough, take it out and let it thaw to room temperature before using the press. 
  • If you don't have a cookie press, you can use a pastry bag with a star tip or other decorative cookie tip.  But since my vintage press is my choice, it comes out every Christmas. We found it years ago at the thrift store.


Thursday, January 11, 2024

Happy New Year!

 Happy New Year to all my friends and followers. I have neglected you shamelessly over the last year. My hubby, Mike had a stroke a year ago last November, and life has changed drastically over his recovery. I will finally have time to devote to my page and have SO many wonderful recipes to share with you. If I have to list a New Year's resolution it is to get back to my book writing and blogs and catch up with all I want to accomplish this upcoming year. Excelsior, my dears, and thanks for being with me through this journey.


Sunday, January 30, 2022

Totally Delicious Banana Walnut Muffins


This recipe is simple and the result is well worth it! These were about the best banana muffins I have made and surprise! I actually had all the ingredients in the house! If you can't eat nuts, they are just as good without them but there is something about bananas and walnuts that is almost magical...

Totally Delicious Banana Walnut Muffins
Ingredients
  • 1 1/2 c all-purpose flour (plus a couple of tbsp to dust pans if necessary)
  • 1 tsp baking powder
  • 1 tsp baking soda
  • 1/2 tsp salt
  • 1 tsp ground cinnamon
  • 1/4 tsp ground nutmeg
  • 3 large bananas, mashed
  • 6 tbsp melted butter: sweet or salted
  • 2/3 c brown or golden brown sugar
  • 1 large egg
  • 1 tsp vanilla extract
  • 2 tbsp milk
  • 1/2 - 1 c chopped walnuts, pecans or chocolate chips (if desired)
Instructions
  1. Preheat oven to 425 degrees. Prepare a medium muffin pan by either spraying it with cooking spray, using cupcake liners or using melted butter to coat each cup then dusted with enough flour to just coat.
  2. In a medium bowl, whisk flour, baking powder, baking soda, cinnamon and nutmeg together . Set aside.
  3. In a large bowl, mash bananas. Using a spatula or wooden spoon (or mixer if you prefer), mix in the melted butter, brown sugar, egg, vanilla extract and milk.
  4. Pour the dry ingredients into the moist ingredients and continue stirring until combined and no dry bits remain. Then add nuts and/or chocolate chips. The batter will be quite thick.
  5. Spoon the batter into cups (prepared as directed in #1), distributing evenly. It will come just below the top of each cup of the tin, which will give you a nice rounded muffin top.
  6. Baked at 425 for 5 minutes, then reduce oven temperature to 350 degrees without removing the muffin pan. Bake for an additional 20-25 minutes, depending upon your oven, or until a toothpick or thin knife blade comes out clean. 
  7. Remove from oven, wait a few minutes and then transfer muffins to wire rack to cool. If using butter/flour, you may want to gently brush off some of the coating from the bottoms before serving.
NOTE: Not all ovens are created equal and some run hotter than others. You learn that by experimenting. Our gas range runs about 10 degrees hotter than our electric oven did, so test the muffins a bit earlier to ensure they don't overbake. Lowering the temperature after 5 minutes (as instructed) gives the tops a nice crusty rounded finish that is the benchmark of a good muffin. Make sure to allow a good amount of time to preheat the oven to begin with so you ensure that it has reached the correct temperature.